
How to Calculate Roof Pitch in Degrees and Inches Per 12

Roof pitch shows up in two languages: roofing language and geometry language. A contractor may call a roof “6/12,” while an architect may note the same roof at about 26.6 degrees. Both describe the same slope. The trick is knowing how to convert between them without mixing up rise, run, angle, and pitch.
If you are verifying an existing roof, checking a plan, or choosing a material, you need both formats. Inches per 12 is the standard shorthand on job sites because it is fast to compare. Degrees are useful in drawings, calculators, and general geometry. This guide shows how to move between the two and how to measure the pitch safely and accurately.
What Roof Pitch Means and Why It’s Measured Two Ways
Roof pitch is the steepness of a roof plane. In roofing work, it is usually written as rise over 12 inches of run, such as 4/12, 6/12, or 12/12. In geometry, the same slope is often expressed as an angle in degrees.
That distinction matters:
- Pitch in roofing usually means the rise per 12 inches of horizontal run.
- Slope is the broader geometric idea of rise divided by run.
- Angle is the measured inclination in degrees.
Roof pitch is measured using horizontal run, not the sloped roof surface.
In practice, people use the terms loosely, but the format changes with the audience. A roofer may prefer 8/12 because it tells them how the roof behaves in the field. An architect may prefer 33.7° because it fits a drawing or model. The safest habit is to report both when the measurement will be shared across trades.
A quick example: if a roof rises 6 inches over 12 inches of horizontal run, the pitch is 6/12. In degrees, that is about 26.6°.
For a useful reference while you work, see our roof pitch calculator tool guide and our companion article on choosing the right roof pitch tool.
The Roof Pitch Formula: Rise, Run, and the 12-Inch Standard
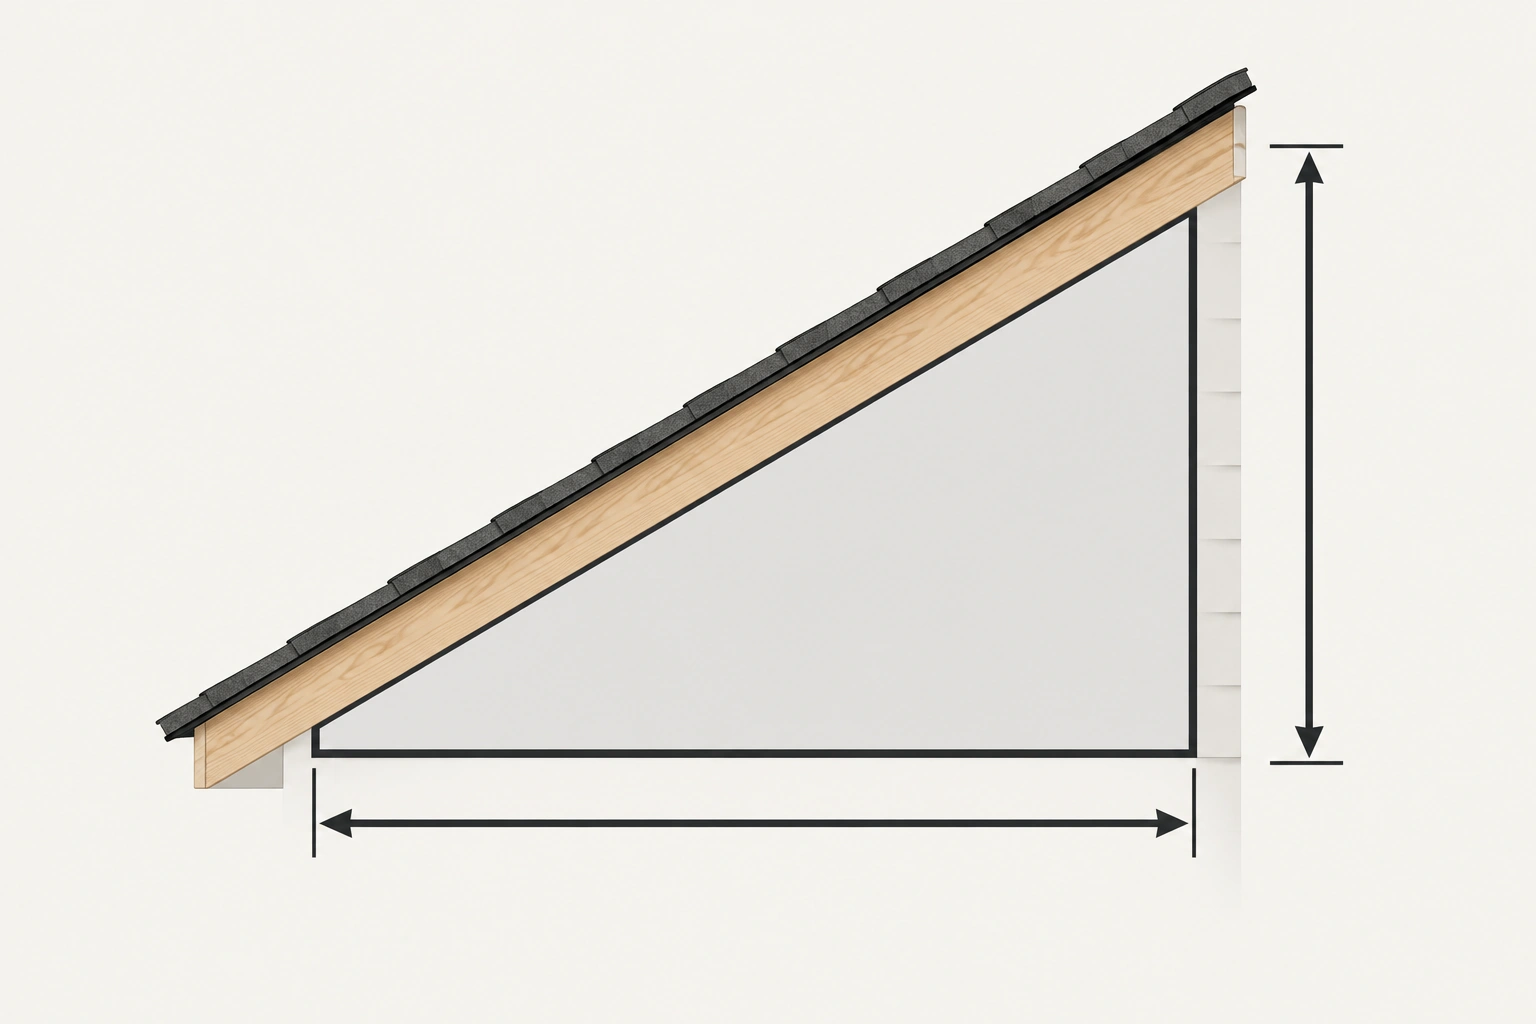
The core idea is simple: roof pitch comes from a right triangle.
- Rise = vertical height
- Run = horizontal distance
- Rafter length = the sloped side of the triangle
The standard roofing convention uses a 12-inch run. That is why roof pitch is usually written as X:12 or X/12.
Quick conversion summary
- Pitch to degrees:
degrees = arctan(rise ÷ run) - Degrees to pitch:
pitch = tan(degrees) × 12
If the roof rises 5 inches for every 12 inches of horizontal travel, the pitch is 5/12.
The basic relationship
If you know rise and run:
- Pitch as a ratio = rise / run
- Pitch in inches per 12 = (rise ÷ run) × 12
So if your measured run is not 12 inches, you convert it to the 12-inch standard.
Example
If a roof rises 9 inches over 24 inches of run:
- 9 ÷ 24 = 0.375
- 0.375 × 12 = 4.5
So the pitch is 4.5/12.
That kind of result is common when a roof is measured carefully. In reporting, some people round to the nearest whole number, but that depends on the purpose. For design work or verification, keep the decimal. For a quick field note, you may round to the nearest half or whole inch per 12, as long as you state that it is rounded.
How to Convert Roof Pitch to Degrees
To convert pitch to degrees, use trigonometry. The roof angle is found with the arctangent of rise divided by run:
angle = arctan(rise ÷ run)
If the pitch is already expressed as inches per 12, you can use:
angle = arctan(pitch ÷ 12)
If you are using a scientific calculator, make sure it is set to degrees, not radians, and that the input is based on horizontal run, not slope length.
Example: 4/12 roof
- rise = 4
- run = 12
- 4 ÷ 12 = 0.3333
- arctan(0.3333) = 18.43°
That matches the example used in roofing calculators and trade references.
Example: 6/12 roof
- 6 ÷ 12 = 0.5
- arctan(0.5) = 26.57°
Example: 12/12 roof
- 12 ÷ 12 = 1
- arctan(1) = 45°
For a geometry refresher, the relationship between the triangle sides is the same one used in the Pythagorean theorem, where rafter² = rise² + run². That matters if you also need the sloped length of the roof plane, not just its angle.
How to Convert Degrees Back to Inches Per 12
Sometimes the roof angle comes from a plan, a digital angle finder, or a design model. To translate degrees back into roofing language, use tangent:
pitch = tan(angle) × 12
That gives you inches of rise for every 12 inches of run.
Example: 30°
- tan(30°) = 0.577
- 0.577 × 12 = 6.93
So a 30-degree roof is about 6.9/12.
Example: 18.43°
- tan(18.43°) ≈ 0.333
- 0.333 × 12 = 4.0
So 18.43° converts back to 4/12.
This reverse conversion is useful when a plan is drawn in degrees but the roofer, estimator, or inspector wants the pitch in the familiar X:12 format. It is also a good check when you are comparing digital tools against a manual measurement.
Step-by-Step Ways to Measure an Existing Roof Pitch
There are three practical ways to measure pitch on an existing roof:
- From the attic
- At the roof edge or rake
- Directly on the roof surface
The best method is the one that gives you a reliable measurement with the least risk.
Method 1: Measure from the attic
This is often the safest option because you avoid unnecessary roof climbing.
- Find a rafter or another framing member with a clear edge.
- Place a level flat and horizontal against the framing member.
- Mark or note the 12-inch point on the level.
- Measure the vertical distance from that 12-inch point down to the roof framing or roof surface reference point.
- That vertical distance is the rise over 12 inches of run.
This method works well when the attic is accessible and the framing is exposed. It is less convenient if insulation, sheathing, or limited headroom blocks access.
Method 2: Measure at the roof edge or rake
If the eaves or rake are accessible, you can use a carpenter’s level and tape measure from the outside without walking far onto the roof.
- Hold the level flat and level against the roof edge or rake.
- Measure 12 inches out from the roof edge along the level.
- From that 12-inch mark, measure vertically to the roof surface.
- Record that vertical distance as the rise over 12 inches of run.
InterNACHI describes this basic approach as measuring how many inches the roof rises in 12 inches.
This is a good balance of simplicity and accuracy when the roof edge is reachable.
Method 3: Measure directly on the roof
This is the most direct method, but it also carries the most risk.
- Place a level on the roof surface.
- Make sure the level is truly level.
- Measure the vertical gap at the 12-inch mark.
- That gap gives you the rise over a 12-inch run.
Use this method only when the roof is safe to access. Steep, wet, icy, or damaged roofs are not good candidates for DIY measurement.
Tools You Can Use: Level, Tape Measure, Framing Square, and Pitch Gauge
The tool you choose affects both speed and confidence.
Level and tape measure
This is the simplest and most universal setup. A 12-inch level works well because it matches the standard pitch basis. A longer level can also work if you measure the run carefully. This method is inexpensive and accurate enough for most homeowner and field-verify tasks.
Best for: attic measurements, eaves, and basic field checks.
Framing square
A framing square is useful because it already gives you a right-angle reference. It can help with quick layout checks and roof geometry, especially when you are working from framing members or comparing pitch to rafter layout.
Best for: builders and renovators who already have layout tools on hand.
Pitch gauge
A pitch gauge is the fastest option when you want a quick read. Many are designed to sit against the roof surface or a framing member and show the pitch directly. Some digital versions also show degrees.
Best for: repeated measurements, jobsite verification, and quick comparisons.
Digital angle finder
A digital angle finder can be very accurate if calibrated correctly. It is especially helpful when you need the angle in degrees for design work or when the roof geometry is irregular.
Best for: architects, detailers, and anyone translating between drawings and field conditions.
The trade-off is simple: manual tools are cheaper and more universal, while digital tools are faster and easier to read but depend more on calibration and battery life.
Measuring Safely From the Attic vs. From the Roof Surface
If you can get the same measurement from inside the attic, that is usually the safer path. You avoid fall exposure and still get a usable pitch reading. The limitation is access. Some attics are cramped, insulated, or finished in a way that makes measurement awkward.
Measuring from the roof surface can be more direct, but it is not worth the risk if the slope is steep or the surface is slippery. If you do go onto the roof, use proper fall protection and stable footing.
A practical rule: if the roof is steep enough to make you hesitate, use the attic or the eave instead.
Common Roof Pitch Examples and a Quick Conversion Reference
Here is a quick reference for common roof pitches and their approximate degree equivalents:
| Roof Pitch | Degrees |
|---|---|
| 2/12 | 9.46° |
| 3/12 | 14.04° |
| 4/12 | 18.43° |
| 5/12 | 22.62° |
| 6/12 | 26.57° |
| 7/12 | 30.26° |
| 8/12 | 33.69° |
| 9/12 | 36.87° |
| 10/12 | 39.81° |
| 12/12 | 45° |
These values are useful as a sanity check. If you measure a roof and get something close to 6.5/12, you should expect an angle in the high 20s, not the teens.
A few practical interpretations:
- 4/12 is a moderate slope and often reads as visibly pitched without being steep.
- 6/12 is a common residential slope and is easy to recognize in the field.
- 8/12 and above start to feel steep in everyday use.
- 12/12 is a 45-degree roof and is clearly steep-slope by visual standards.
If your measurement lands between common values, keep the decimal until you know how the number will be used.
Common Mistakes That Throw Off Roof Pitch Measurements
The biggest errors are usually not trigonometric. They are measurement errors.
Measuring along the slope instead of horizontally
Roof pitch is based on horizontal run, not the distance along the roof surface. If you measure along the slope, the pitch will be wrong.
Using the wrong run
A pitch written as X:12 assumes 12 inches of horizontal run. If you use 12 inches along the roof surface, you are not measuring the standard basis.
Forgetting to level the tool
If the level is not actually level, the rise measurement will be off. Even a small tilt changes the result.
Rounding too early
If you convert 4.5/12 to 5/12 too soon, you lose useful precision. That may be fine for a rough note, but not for plan verification.
Mixing up pitch and angle
A roof is not “6 degrees” just because it is 6/12. That is a very different slope. Always state the unit.
How Roof Pitch Affects Material Choice, Drainage, and Design Decisions
Roof pitch is not just a number for a drawing note. It affects how the roof performs and what materials are appropriate.
Steeper roofs shed water faster, which can be helpful in wet climates. Lower slopes hold water longer and demand more careful detailing. That is why pitch matters when comparing roofing systems. Some materials are better suited to steep-slope roofs, while others are designed for low-slope conditions.
If you are selecting materials, the pitch is one of the first checks to make. A roof that looks “normal” from the street may still fall into a lower-slope category that changes the material options. That is especially important in renovation work, where a new covering must match the roof geometry already in place.
Pitch also affects how a roof reads architecturally. A steeper roof can look more traditional or prominent. A lower pitch can look more contemporary and reduce the apparent height of the building. That design choice should be deliberate, not accidental.
For a broader look at how pitch can influence project budgeting and labor, see our article on whether roof pitch affects replacement cost.
When to Consult an Architect or Roofing Pro
Bring in a professional when the pitch measurement will affect a permit set, a reroof specification, or a material decision you do not want to guess on. That is especially true if the roof is steep, the attic is inaccessible, or the structure has multiple intersecting planes.
An architect or roofing pro can also help when the roof pitch appears inconsistent from one side to another. That can happen on older homes, additions, or roofs that have settled over time. In those cases, a single measurement may not tell the whole story.
FAQ
Is roof pitch the same as roof slope?
Not exactly. In everyday roofing use, people often use the terms interchangeably, but slope is the broader geometric idea. Pitch is usually reported as inches of rise per 12 inches of run.
Why is roof pitch usually written as X:12?
Because 12 inches is the standard run used for comparison. It makes it easy to compare one roof to another without converting every time.
How do I convert 4/12 to degrees?
Use arctangent: arctan(4 ÷ 12) = about 18.43°.
How do I convert degrees to inches per 12?
Use tangent: tan(angle) × 12.
What is the easiest way to measure roof pitch?
For many people, the easiest method is a level and tape measure from the attic or roof edge. It is simple, inexpensive, and accurate enough for most checks.
Can I measure roof pitch without climbing onto the roof?
Yes. If the attic or eave is accessible, you can often measure safely from inside or from the edge.
What if my measurement is 4.5/12?
Keep the decimal if accuracy matters. If you are reporting a rough field note, you may round based on the context, but note that it is rounded.
Do I need both degrees and inches per 12?
Not always, but reporting both is often the clearest way to communicate with different trades and design teams.
