
Roof Hatch Safety on Metal Roofs: A Practical Homeowner Guide

A roof hatch can make inspection, maintenance, HVAC service, and other rooftop work much easier. But it also creates one of the most important fall-risk areas on a roof.
For homeowners with a metal roof, roof hatch safety involves more than simply having a hatch that opens and closes. The ladder, hatch opening, guardrails, walking surface, flashing, roof slope, weather conditions, and the way workers enter and exit the roof all affect safety.
A poorly positioned or damaged hatch can also become a leak point, especially where the hatch curb meets metal roofing panels.
This guide explains how roof hatch safety works, what OSHA rules say about workplace access, what homeowners should inspect, and when a roofing contractor or safety professional should handle the job.
Quick Answer
Roof hatch safety means providing secure ladder access, adequate hatch clearance, fall protection around exposed openings, a stable walking surface, and a properly installed, weather-tight hatch. On metal roofs, extra attention should be given to slippery panels, hatch flashing, roof slope, and safe transition points between the ladder and rooftop.
Why Roof Hatch Safety Matters
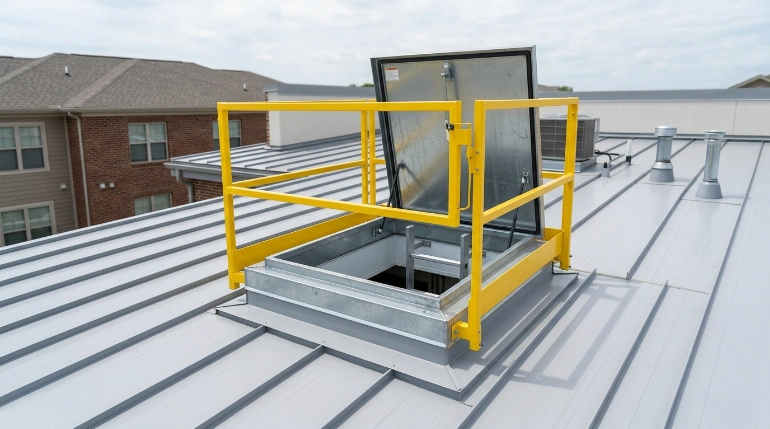
A roof hatch is essentially an opening in the roof that allows a person to move between the building interior and the rooftop.
When closed, the opening may seem harmless. Once the hatch is open, however, anyone walking nearby may be exposed to a serious fall hazard.
The transition itself can also be difficult. A person climbing through a hatch may need to:
- Push or hold the hatch cover open.
- Move from a vertical ladder onto the roof.
- Find a secure handhold.
- Step onto a potentially wet or slippery surface.
- Carry tools or equipment.
- Avoid stepping backward into the open hatch.
Metal roofing can increase some of these concerns because smooth coated panels may become extremely slick when wet, frosted, dusty, or covered with loose debris.
A roof hatch should be treated as an access system, not just as a door in the roof.
The hatch, ladder, guardrails, surrounding roofing, and rooftop work area all need to function together.
Understanding OSHA Roof Hatch Safety Requirements
Homeowners often search for “OSHA roof hatch requirements,” but an important distinction needs to be made.
OSHA standards primarily regulate workplace safety and employer responsibilities. They may therefore apply when employees, maintenance personnel, roofing crews, HVAC technicians, or other workers are using the roof hatch. They do not automatically function as a homeowner DIY building code.
Local building codes, fire codes, manufacturer requirements, and other regulations may also apply.
Still, OSHA’s standards provide useful safety benchmarks for understanding why roof hatch design and fall protection matter.
Fixed Ladder Requirements at a Roof Hatch
According to the current OSHA ladder requirements, fixed ladders must meet specific dimensional, clearance, load, and access requirements. OSHA also states that when a fixed ladder terminates at a hatch, the hatch cover must provide sufficient clearance for easy access and, when counterbalanced, must open at least 70 degrees from horizontal.
OSHA also requires workers using ladders to face the ladder while climbing and use at least one hand to grasp it. Objects that could cause a worker to lose balance should not be carried while climbing.
For homeowners, that translates into a practical rule:
Do not plan roof access around a person climbing a ladder while holding tools, buckets, large inspection equipment, or roofing materials.
Tools should be transferred separately whenever possible.
Fall Protection Around Openings
An open roof hatch can expose a person to a vertical drop.
OSHA’s walking-working surface fall protection requirements identify guardrails, covers, travel-restraint systems, and personal fall-arrest systems as recognized forms of protection in various fall-hazard situations. The applicable system depends on the type of opening and work being performed.
For normal household ownership, the exact legal requirement may differ. But from a practical safety standpoint, leaving an unguarded hatch open while people are working nearby is a poor practice.
The Main Roof Hatch Hazards Homeowners Should Know
Several hazards can exist at the same roof hatch.
| Hazard | Why It Matters | Practical Protection |
|---|---|---|
| Open hatch | Person can fall into opening | Guardrail or approved protective system |
| Slippery metal roof | Reduced traction | Dry conditions and slip-resistant access area |
| Poor ladder transition | Loss of balance while exiting | Correct ladder and hatch configuration |
| Damaged hatch cover | Cover may not remain secure | Inspection and repair |
| Corroded ladder | Rungs or fasteners may weaken | Professional inspection |
| Leaking hatch curb | Moisture can damage roof assembly | Proper flashing and sealant repair |
| Hatch near roof edge | Multiple fall hazards may overlap | Professional fall-protection planning |
| Ice or condensation | Severe slipping risk | Delay access until conditions are safe |
The safest roof hatch is one that lets a worker maintain control throughout the entire transition.
Roof Hatch Safety on a Metal Roof
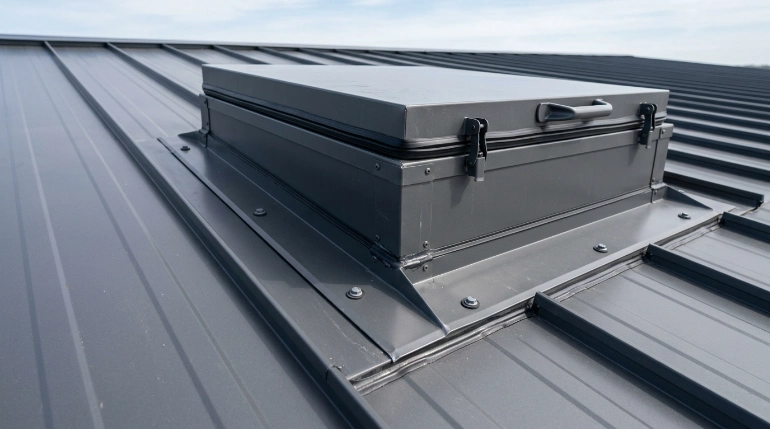
Metal roofing deserves special consideration because the walking surface behaves differently from asphalt shingles and many other residential roofing materials.
Metal Roof Panels Can Become Slippery
A dry metal roof may already require careful footing. Add water, morning dew, frost, algae, dust, pollen, or loose debris and traction can decrease dramatically.
Do not assume a roof is safe simply because the weather is currently clear. Early-morning condensation can make metal panels slick even when it has not rained.
Never climb through a roof hatch directly onto wet, icy, or visibly contaminated metal roofing.
A contractor may use specialized footwear, walk pads, fall protection, or other equipment depending on the roof and work being performed.
Roof Pitch Changes the Risk
Pitch means the steepness or slope of the roof.
A low-slope metal roof is generally easier to navigate than a steep standing-seam roof, but a low slope does not eliminate fall hazards.
As roof pitch increases, gravity makes it harder to stop a slip.
The hatch location should therefore be evaluated together with:
- Roof slope.
- Distance to roof edges.
- Nearby parapet walls.
- Rooftop equipment.
- Drainage paths.
- Panel seams.
- Available fall-protection systems.
A hatch that is acceptable in one roof layout may be poorly positioned in another.
The Roof Hatch Curb and Flashing Are Safety Issues Too
Roof hatch safety is not only about falling.
A leaking hatch can introduce water into insulation, decking, ceilings, electrical components, and interior spaces.
Most roof hatches sit on a raised curb. The curb lifts the opening above the roof surface and provides a connection point between the hatch and roofing assembly.
On a metal roof, this detail must account for water flow and movement of the roofing system.
Warning signs around a hatch include:
- Rust or corrosion.
- Cracked sealant.
- Loose flashing.
- Open seams.
- Bent metal.
- Water staining below the hatch.
- Wet insulation.
- Interior ceiling stains.
- Standing water around the curb.
- Fasteners backing out.
If you see these problems, do not simply cover everything with another layer of sealant.
The actual problem may involve flashing design, panel movement, failed fasteners, deteriorated membranes, or an improperly installed curb.
Inspect the Hatch Cover Before Using It
The hatch cover should open smoothly without requiring someone to fight against excessive resistance.
Check for:
- Binding hinges.
- Corroded hardware.
- Broken springs or counterbalance components.
- Damaged handles.
- Loose fasteners.
- Sharp metal edges.
- Failed latches.
- Unexpected movement when the cover is open.
The cover should not unexpectedly slam closed while someone is climbing through the opening.
If the hatch is heavy, unstable, distorted, or difficult to operate, stop using it until it has been evaluated.
Inspect the Fixed Ladder
Roof hatch ladders often remain out of sight, so they may be ignored for years.
That does not mean they remain safe indefinitely.
OSHA’s ladder rules require workplace ladders to be inspected for visible defects and require defective ladders to be removed from service until repaired or replaced.
Homeowners can apply the same basic principle.
Look for:
- Rust around rungs and attachments.
- Loose bolts.
- Bent ladder rails.
- Cracked welds.
- Missing rungs.
- Sharp edges.
- Movement when weight is applied.
- Obstructions behind or beside the ladder.
- Water damage around ladder attachment points.
Do not test a visibly damaged ladder by climbing it.
Have the attachment and surrounding building structure inspected first.
Ladder-to-Roof Transition Safety
One of the highest-risk moments occurs when a person moves from the ladder onto the roof.
OSHA specifies dimensional requirements for fixed ladders, including clearances and step-across distances, so workers have adequate room to make the transition.
A homeowner does not need to memorize every measurement to identify an obviously poor setup.
Be concerned if:
- You must twist sharply to exit.
- Your shoulders barely fit through the hatch.
- There is nowhere secure to place your hands.
- The first rooftop step is awkward or unusually high.
- Pipes or equipment block the opening.
- The hatch lid restricts movement.
- You emerge immediately beside a roof edge.
- The surrounding roof surface is damaged.
These conditions deserve professional review.
Guardrails and Roof Hatch Protection
One of the best ways to reduce roof hatch fall risk is to prevent accidental access to the open sides of the hatch.
Depending on the building and workplace requirements, this may involve an engineered guardrail system, a gate, or another approved fall-protection method.
OSHA’s current standards also establish performance criteria for guardrail and other fall-protection systems. Building owners responsible for employee access should have systems evaluated against the applicable OSHA fall-protection criteria.
Do not assume that a makeshift chain, rope, wooden barrier, or improvised railing automatically provides adequate protection.
A permanent system should be appropriate for its intended use and properly attached.
Expert Tip: Stand inside the building and look up through the hatch before climbing. If you cannot clearly identify where your hands and feet will go during the transition, have the access setup evaluated before using it.
Fixed Ladders Over 24 Feet Need Special Attention
Ladder height becomes especially important in workplace applications.
Under OSHA’s general-industry rules, fixed ladders extending more than 24 feet above a lower level have specific fall-protection requirements.
For example, new fixed ladders installed on or after November 19, 2018 must use a personal fall-arrest system or ladder-safety system. OSHA also establishes a transition schedule for older fixed ladders, with all fixed ladders covered by the rule requiring a personal fall-arrest or ladder-safety system by November 18, 2036.
That requirement should not be simplified into “every roof hatch needs the same ladder system.”
Building type, ladder configuration, height, use, construction activity, and applicable standards all matter.
If your building has a long fixed access ladder, professional evaluation is appropriate.
A Practical Roof Hatch Inspection Checklist
Homeowners and building managers can perform a basic visual check without stepping onto the roof.
1. Inspect From Below
Look for rust, water stains, damaged ceiling materials, loose ladder hardware, and signs that the hatch curb has leaked.
2. Check the Ladder
Do not climb if the ladder appears bent, loose, corroded, cracked, or improperly attached.
3. Operate the Hatch From a Safe Position
Confirm that the cover opens properly and does not bind, fall unexpectedly, or interfere with the climbing path.
4. Look at Rooftop Conditions
Before fully exiting, check for:
- Rain.
- Frost.
- Ice.
- Standing water.
- Loose debris.
- Strong wind.
- Nearby electrical hazards.
- Roofing work in progress.
5. Check the Landing Area
The area directly outside the hatch should provide enough room to transition safely.
6. Identify Nearby Roof Edges
A hatch close to an unprotected edge deserves additional attention.
7. Keep Your Hands Available
Do not climb while carrying bulky equipment.
If anything feels unstable or awkward, climb back down rather than trying to force the transition.
Weather and Roof Hatch Safety
Weather can turn a normally manageable roof into a dangerous surface.
Avoid roof access during:
- Rain.
- Thunderstorms.
- High winds.
- Freezing conditions.
- Snow or ice accumulation.
- Heavy dew.
- Extreme heat that may affect roofing surfaces or worker safety.
Metal roofs can heat significantly in direct sunlight, while wet metal can become dangerously slippery.
Waiting for safer conditions is usually more sensible than turning a routine inspection into a fall emergency.
Roof Hatch Maintenance and Roof Lifespan
A properly maintained hatch should be inspected as part of routine roof maintenance.
The surrounding roof assembly may need more attention as it ages because sealants, gaskets, fasteners, coatings, flashing, and mechanical components can deteriorate.
The hatch itself does not determine the lifespan of a metal roof, but an unresolved hatch leak can damage materials underneath otherwise serviceable roofing.
During a professional roof inspection, ask the contractor to inspect:
- Hatch curb flashing.
- Panel transitions.
- Sealants.
- Fasteners.
- Hinges.
- Gaskets.
- Drainage around the hatch.
- Interior evidence of moisture.
- Ladder attachments.
Catching deterioration early may allow a localized repair instead of waiting for moisture damage to spread.
Roof Hatch Repair and Cost Considerations
There is no single roof hatch repair price that applies to every home or building.
Cost depends on what actually needs attention.
A simple adjustment or replacement gasket can be very different from rebuilding a curb, modifying the fixed ladder, installing engineered guardrails, or replacing damaged metal roofing around the opening.
Major cost factors include:
- Hatch size and material.
- Roof height.
- Metal roof type.
- Roof pitch.
- Accessibility.
- Flashing complexity.
- Structural repairs.
- Ladder modifications.
- Guardrail requirements.
- Fall-protection setup needed by the crew.
- Interior water damage.
- Local labor rates.
Ask contractors to separate the estimate into hatch work, roofing/flashing work, access or fall-protection work, and structural work when appropriate.
That makes competing estimates easier to compare.
Warranty Considerations
Before modifying a roof hatch on a newer metal roof, check the roofing warranty and hatch manufacturer’s requirements.
Cutting panels, drilling new attachments, installing incompatible fasteners, or altering flashing without following the approved installation method may cause leaks and could affect warranty coverage.
If the roof is still covered, contact the original installer or manufacturer before making significant changes.
Keep photographs, inspection reports, invoices, and repair records.
These documents may also be useful if you later have a storm-damage or insurance claim.
Common Mistakes Homeowners Should Avoid
- Treating the hatch as a normal doorway. Entering a roof requires much more balance and fall awareness than walking through a door.
- Climbing onto wet metal roofing. Even experienced workers can lose footing on contaminated metal panels.
- Carrying tools while climbing. Keep your hands available for the ladder.
- Ignoring a loose ladder rung. A small defect can become critical during the transition.
- Leaving the open hatch unprotected. Someone working on the roof can accidentally step or fall into it.
- Using improvised guardrails. Fall-protection systems should be appropriate for the hazard.
- Caulking every leak without diagnosis. Repeated sealant patches can hide a flashing or curb problem.
- Ignoring nearby roof edges. Safe hatch access does not make the rest of the roof automatically safe.
- Assuming OSHA rules and residential building codes are identical. Different rules can apply depending on how the building and roof are used.
- Modifying a metal roof without considering the warranty. Incorrect penetrations or flashing work can create expensive future problems.
When to Consult a Licensed Roofing Contractor
Roof hatch work should move beyond DIY inspection when the condition involves the roofing assembly, structural attachment, fall protection, or unsafe access.
Call a qualified roofing contractor if:
- Water is entering around the hatch.
- Metal panels around the curb are bent or corroded.
- The hatch curb appears loose.
- The roof surface around the opening feels soft or damaged.
- You suspect wet insulation or decking.
- Flashing is lifting or separating.
- The hatch is difficult to open safely.
- You cannot safely reach the roof for inspection.
- The roof is steep.
- Significant storm damage is present.
A structural professional may also be appropriate if ladder or hatch attachments appear to be pulling away from framing.
For a commercial or workplace setting, involve a qualified safety professional when OSHA compliance, employee fall protection, long fixed ladders, or engineered guardrail systems are involved.
Do not climb onto a questionable roof simply to determine how bad the problem is. A contractor can use appropriate access and fall-protection equipment to perform the inspection.
FAQs
Does a roof hatch need a guardrail?
A roof hatch may require fall protection when it creates an exposed fall hazard in a workplace. The exact requirement depends on the building, work activity, and applicable standard. Even where a specific OSHA rule does not apply to a homeowner, guarding an open hatch is a sensible safety measure.
Can I walk on a metal roof after exiting a roof hatch?
Only when the roof is designed for the activity and conditions are safe. Metal panels can become very slippery when wet, frosted, dusty, or covered with debris. Roof pitch and distance to edges also affect risk.
Should a roof hatch be kept open while someone works on the roof?
The access plan should account for both emergency egress and the fall hazard created by the opening. An unattended, exposed opening can be dangerous. A suitable guarding system can allow access while protecting the hatch perimeter.
How often should a roof hatch be inspected?
Include the hatch whenever the roof receives routine professional inspection and inspect it after severe storms or whenever you notice leaks, corrosion, difficult operation, or loose hardware.
Can a roof hatch cause a metal roof leak?
Yes. Water can enter where the hatch curb, flashing, panels, fasteners, seals, or adjacent roofing components fail. The source should be diagnosed rather than automatically covered with more sealant.
Can I repair a leaking roof hatch myself?
Minor maintenance may be within the ability of some homeowners, but repairs requiring roof access, metal-panel modification, flashing reconstruction, structural work, or fall protection are better handled professionally.
Are OSHA roof hatch rules required on a private home?
OSHA regulates workplace safety rather than ordinary homeowner DIY activity. However, OSHA requirements may become relevant when employees or workers use the roof. Residential building codes and local requirements may also apply, so specific projects should be checked locally.
Conclusion
Good roof hatch safety starts before anyone climbs the first rung.
The ladder needs to be secure. The hatch needs to operate correctly. The opening needs appropriate protection. The rooftop landing area must be clear, and the surrounding metal roofing must provide safe conditions for whatever work will be performed.
Pay particular attention to water around the curb, damaged flashing, corrosion, loose ladder components, slippery metal panels, and unprotected openings.
If the hatch, ladder, roof structure, or fall-protection setup raises questions, avoid improvising. Have a qualified roofing contractor or safety professional evaluate the system.
A roof hatch should make roof access safer and more controlled—not create another hazard.