
Roof Coating Removal Safety: How to Strip a Metal Roof Safely

Removing an old coating from a metal roof can look simple until you start dealing with peeling layers, rust, sharp panel edges, chemical strippers, power tools, and a slippery roof surface.
That is why roof coating removal safety should come before speed. The wrong removal method can injure you, expose you to hazardous dust or chemicals, damage galvanized or coated metal panels, and make the next roof coating fail prematurely.
This guide explains how homeowners can approach metal roof coating removal safely, which hazards deserve the most attention, how removal methods compare, and when the job should be left to a qualified roofing contractor.
Quick Answer
Roof coating removal safety starts with identifying the old coating, checking for hazardous materials, controlling fall risks, and choosing the least aggressive removal method that works. Wear appropriate protective equipment, avoid uncontrolled sanding or grinding, follow chemical-product instructions, and stop if the roof is steep, deteriorated, structurally questionable, or difficult to access safely.
Why Roof Coating Removal Can Be Dangerous
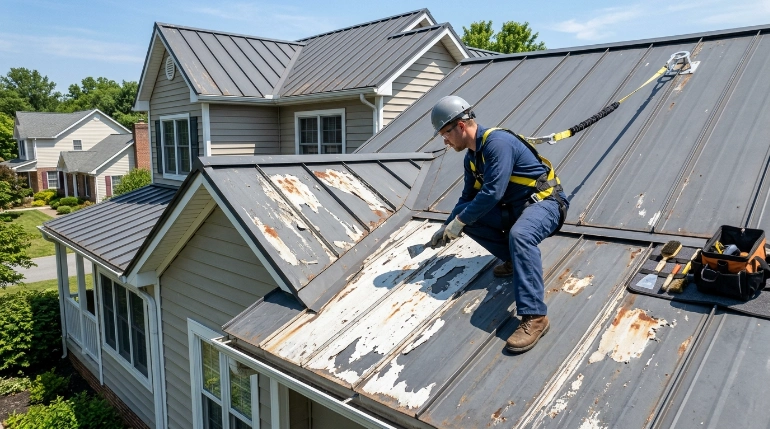
A metal roof coating may need to be removed because it is peeling, blistering, cracking, separating from the substrate, or incompatible with the coating you plan to apply next.
The problem is that removal creates several risks at the same time.
You may be dealing with:
- Falls from the roof edge
- Slips caused by water, cleaner, or chemical stripper
- Sharp sheet-metal edges
- Rusted or weakened panels
- Airborne paint or coating dust
- Chemical burns and irritating vapors
- Flying debris from power tools
- Electrical hazards around rooftop equipment
- Damage to the metal’s protective finish
- Lead or other hazardous substances in older coatings
- Hazardous roofing mastics or coatings on older buildings
Do not treat coating removal like ordinary exterior painting. You are working on an elevated metal surface while intentionally disturbing a protective material.
Start With Fall Protection, Not the Coating
Falls are one of the most serious hazards associated with roofing work.
Metal roofs can become especially slippery when covered with dust, loose coating flakes, cleaning solution, dew, chemical stripper, or rinse water.
OSHA’s residential construction fall protection guidance explains that workers exposed to significant fall hazards generally need appropriate systems such as guardrails, safety nets, fall arrest, or other permitted protection. OSHA rules are written primarily for employers and workers, but the hazards they address are equally important for homeowners to understand.
A homeowner should reconsider DIY removal when:
- The roof has a steep pitch.
- You cannot establish a secure access point.
- The roof is more than one story high.
- Panels are wet or extremely smooth.
- Strong wind is present.
- Sections of the roof feel unstable.
- Skylights or unprotected openings are nearby.
- Your work requires moving backward while scraping or washing.
Never depend on sneakers, caution, or experience alone to prevent a roof fall.
Rain, dew, frost, high winds, and wet coating-removal methods can make an otherwise manageable roof dangerous very quickly.
Identify What You Are Removing Before Starting
Not every metal roof has the same coating.
You may find acrylic elastomeric coatings, silicone, urethane, asphaltic coatings, conventional paint, factory-applied finishes, primers, repair mastics, or several generations of materials layered over one another.
The roof itself may also be:
- Galvanized steel
- Galvalume or similar coated steel
- Painted steel
- Aluminum
- Standing-seam metal
- Exposed-fastener metal panels
This matters because a method that safely removes loose acrylic coating may be unnecessarily aggressive for a factory-finished galvanized panel.
Before removing everything, determine why the existing coating is failing.
Possible causes include:
- Poor surface preparation
- Dirt or oil under the coating
- Trapped moisture
- Rust
- Incompatible coating systems
- Application during unsuitable weather
- Ponding water
- Failed seams or fasteners
- Normal coating deterioration
Removing 100% of an old coating is not always necessary.
Manufacturer surface-preparation guidance emphasizes that preparation should match the substrate and coating system. Previously coated surfaces may sometimes retain sound, well-adhered material, while incompatible systems can require complete removal.
Check Older Roof Coatings for Hazardous Materials
Age should affect your removal plan.
Lead Paint and Older Coatings
If the home was built before 1978 or the history of its exterior coatings is unknown, take extra precautions before sanding, grinding, blasting, or aggressively scraping painted surfaces.
EPA warns that disturbing lead-based paint during renovation can create hazardous dust. Its lead-safe renovation guidance for homeowners recommends containing debris, minimizing dust, using appropriate cleanup methods, and considering trained lead-safe professionals when older painted surfaces are involved.
A lead test or professional assessment may be appropriate before mechanical removal.
Asbestos-Containing Roofing Materials
Some older roofing cements, mastics, coatings, flashings, and related materials have historically contained asbestos.
Appearance alone cannot reliably tell you whether a material contains asbestos.
OSHA guidance specifically discusses asbestos-containing roofing coatings, cements, mastics, and flashings and cautions against sanding, abrading, or grinding certain asbestos-containing materials during removal.
If you suspect asbestos, stop before disturbing the material and have it properly evaluated.
Roof Coating Removal Methods Compared
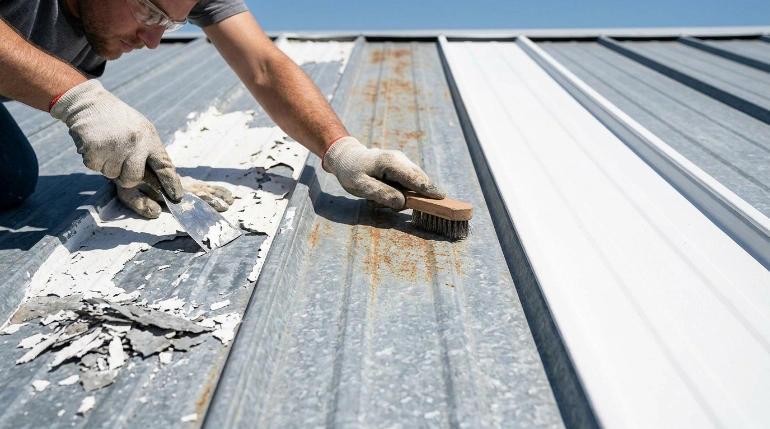
Different conditions call for different methods.
| Removal Method | Best Used For | Main Safety Concern | Risk to Metal |
|---|---|---|---|
| Hand scraping | Loose or peeling coating | Cuts, falls, repetitive strain | Low when done carefully |
| Wire brushing | Rust and stubborn loose material | Flying particles, sharp debris | Moderate |
| Power sanding | Firm coatings or corrosion | Dust, sparks, substrate damage | Moderate to high |
| Grinding | Heavy localized material | Sparks, dust, panel damage | High |
| Chemical stripper | Compatible removable coatings | Burns, fumes, slippery surface | Depends on chemical |
| Pressure washing | Loose coating and contamination | Falls, injection injury, water intrusion | Moderate |
| Abrasive blasting | Large professional projects | Dust, rebound, substrate damage | High without proper control |
For many homeowners, the safest principle is simple:
Use the least aggressive method capable of achieving the required surface preparation.
You generally do not need to turn a perfectly serviceable metal panel into bright bare steel unless the new coating specification actually requires it.
A Safer Step-by-Step Removal Process
1. Inspect the Roof From a Safe Location
Start on the ground whenever possible.
Look for:
- Severe rust
- Loose panels
- Missing fasteners
- Open seams
- Sagging
- Holes
- Soft decking underneath
- Storm damage
- Evidence of leaking
- Damaged flashing
If structural stability is questionable, do not climb onto the roof.
2. Review the New Coating Requirements
Before removing the old coating, find out what the replacement system requires.
The coating manufacturer may call for:
- Removal of loose material only
- Full coating removal
- Rust treatment
- Specific cleaning
- A compatible primer
- Adhesion testing
- A minimum dry surface
- Particular weather conditions
This step can save substantial labor.
For example, some roof-coating systems require the roof to be clean, dry, repaired, and adhesion-tested before application rather than automatically requiring every trace of the previous material to be stripped away.
3. Test a Small Area
Choose a controlled section away from the roof edge.
Test your proposed removal method and determine:
- How easily the old coating releases
- Whether multiple layers exist
- Whether the metal becomes scratched
- Whether rust is hiding underneath
- Whether chemicals affect the finish
- How much debris or dust is generated
A small test area can prevent an expensive whole-roof mistake.
4. Set Up the Work Area
Keep people, pets, vehicles, landscaping, HVAC intakes, and neighboring property protected from debris.
Secure tools so they cannot slide off the roof.
Use suitable containers or bags for removed material instead of allowing flakes to blow across the yard.
Never throw coating debris, sharp metal, or contaminated waste from the roof.
5. Remove Loose Material First
Begin with coating that is already lifting.
A hand scraper may remove large loose sections with far less dust than aggressive grinding.
Keep the scraper reasonably flat against the panel so you remove the failed coating rather than gouging the underlying metal.
Be particularly careful around:
- Panel seams
- Fastener heads
- Flashing
- Ridge caps
- Penetrations
- Sealant joints
Damaging these areas can create leaks.
6. Treat Rust Separately
Once loose coating is gone, inspect exposed corrosion.
Light surface rust may need cleaning and preparation before receiving an appropriate primer. Severe corrosion, perforation, or significant metal loss is different.
A coating cannot restore structural strength to badly deteriorated sheet metal.
Panels with holes, widespread deep corrosion, damaged seams, or significant thinning may need repair or replacement instead of another coating.
7. Control Dust During Mechanical Removal
Sanding and grinding can generate substantial airborne material.
If mechanical preparation is required, use dust collection and containment appropriate for the coating involved.
EPA lead-safe guidance recommends dust-minimizing methods and HEPA-filtered collection when disturbing lead-painted surfaces.
Avoid uncontrolled dry grinding if you do not know what the existing coating contains.
Eye protection is also essential because small metal fragments, rust particles, and coating chips can become projectiles.
Be Extremely Careful With Chemical Strippers
Chemical removal can reduce some mechanical abrasion, but that does not automatically make it safer.
Strippers may contain corrosive, irritating, flammable, or toxic ingredients.
Always review:
- Product label
- Safety Data Sheet
- Required gloves
- Eye protection
- Respiratory precautions
- Ventilation requirements
- Application temperature
- Disposal instructions
- Substrate compatibility
EPA prohibited consumer sales of methylene chloride paint and coating removal products after determining that exposure had caused acute fatalities. You can review the agency’s methylene chloride paint-remover rule.
OSHA also identifies inhalation and skin exposure as significant methylene chloride hazards.
Do not assume a product is harmless simply because it is marketed as a replacement for an older stripper. Substitute chemicals can still require gloves, goggles, ventilation, careful handling, and controlled disposal.
Chemical Strippers Create Another Roof Hazard
A stripper that softens a coating can also leave the roof extremely slippery.
Plan your movement before applying it.
Never coat a large walking area with stripper and then expect to cross it safely.
Work in small controlled sections while maintaining a clean, secure route to your access point.
Pressure Washing Requires Extra Caution
Pressure washing is sometimes useful for cleaning and removing poorly adhered material, but the combination of water and smooth metal can dramatically reduce traction.
It can also force water under:
- Lap joints
- Ridge details
- Flashing
- Loose fasteners
- Roof penetrations
- Damaged seams
High-pressure equipment can injure skin and damage coatings or sealants when used incorrectly.
If washing is part of the manufacturer’s preparation procedure, control the pressure and spray direction and allow the roof to dry completely before continuing.
Never work on an electrically hazardous roof area with uncontrolled water spray.
Protect the Metal Substrate
A common removal mistake is assuming that more aggressive preparation is always better.
It is not.
Galvanized steel depends on a protective zinc layer. Other metal roof products may have metallic or factory-applied protective finishes.
Over-grinding can remove more than the failed coating.
That may expose metal unnecessarily and create new corrosion problems.
Use tools that give you control. Keep abrasive work localized where possible and follow the requirements of the coating and roof-panel manufacturer.
Expert Tip: Before committing to full removal, make three small test patches using progressively stronger preparation methods. Stop at the least aggressive method that produces a clean, sound surface with acceptable adhesion for the new system.
Personal Protective Equipment for Coating Removal
The required PPE depends on the method and material, so there is no single kit appropriate for every project.
Possible protection includes:
- Safety glasses or sealed goggles
- Face shield for high-debris operations
- Chemical-resistant gloves
- Cut-resistant work gloves
- Long sleeves and protective clothing
- Appropriate work boots
- Hearing protection
- Respiratory protection selected for the specific hazard
- Fall restraint or fall arrest equipment where appropriate
A disposable dust mask does not automatically protect against chemical vapors.
Likewise, a chemical-resistant glove suitable for one stripper may be unsuitable for another.
Use the product’s Safety Data Sheet to determine what protection is required.
Protect Roof Seams, Fasteners, and Flashing
Coating removal should not turn into roof damage.
Pay special attention around screws and fasteners. Aggressive wire wheels and grinders can damage washers, strip protective coatings, or scar panels.
At seams and penetrations, removing old material may expose failed sealants that were previously hidden.
That is useful information, but it also means the roof may need repairs before recoating.
Do not simply paint over:
- Loose fasteners
- Failed sealant
- Open seams
- Rust holes
- Cracked flashing
- Moisture-related damage
Coating works best as part of a sound roof system, not as a substitute for necessary repair.
Weather Matters More Than Homeowners Expect
Choose a dry, mild work period.
Avoid removal during:
- Rain
- Frost
- Heavy dew
- High winds
- Extreme heat
- Thunderstorms
Hot metal panels can increase physical stress and may change the behavior of chemical products.
Wind can carry dust and coating debris beyond your work area.
Wet weather can make the roof dangerously slippery.
OSHA roofing guidance also recognizes adverse weather and slippery surfaces as important fall hazards during roof work.
Cost and Labor Considerations
Full coating removal is usually much more labor-intensive than cleaning and removing only failed material.
Cost depends heavily on:
- Roof square footage
- Roof pitch
- Height and access
- Coating thickness
- Number of coating layers
- Removal method
- Rust severity
- Waste handling requirements
- Hazardous-material testing
- Fall-protection requirements
- Repairs needed after removal
- Primer and replacement coating system
This is why the cheapest-looking DIY approach can become expensive if it damages the metal panels.
For example, aggressively grinding a galvanized roof to bare metal may create additional priming, corrosion-control, and repair requirements that would not have been necessary with proper preparation.
How Coating Removal Affects Roof Lifespan and Warranty
Metal roofs can have long service lives, but their performance depends on protecting the panels, seams, fasteners, and factory finishes.
Improper coating removal can shorten that service life.
Before stripping a relatively new metal roof, check:
- Roof-panel warranty
- Paint or finish warranty
- Previous coating warranty
- Contractor workmanship warranty
- New coating manufacturer’s requirements
A manufacturer may require specific cleaning, preparation, primer, application thickness, or adhesion testing.
Document the roof’s condition before work begins.
Photos of corrosion, coating failure, seams, fasteners, and repaired areas can be useful if warranty or insurance questions arise later.
Common Mistakes Homeowners Should Avoid
- Grinding everything to bare metal unnecessarily. More removal is not automatically better.
- Ignoring fall protection. Coating dust, water, and chemicals can make metal roofing extremely slippery.
- Sanding unknown old coatings. Test or evaluate older materials before creating airborne dust.
- Using chemical stripper without reading the SDS. Gloves and respiratory requirements vary significantly.
- Removing coating before choosing the replacement system. Preparation requirements should come from the new coating manufacturer.
- Recoating over active rust. Corrosion needs proper preparation and, when appropriate, compatible primer.
- Coating over structural problems. A coating does not repair badly corroded panels or damaged decking.
- Using excessive pressure washing. Water can enter vulnerable seams and penetrations.
- Working during poor weather. Wind and moisture increase both fall risk and contamination problems.
- Skipping a test patch. Testing can reveal compatibility and adhesion problems before they spread across the roof.
When to Consult a Licensed Roofing Contractor
DIY removal makes the most sense only when the roof is safely accessible, structurally sound, and the coating can be prepared using a straightforward method.
Call a qualified roofing contractor when:
- The roof is steep or high.
- Safe fall protection cannot be established.
- Large areas require grinding or blasting.
- Significant rust is present.
- Panels have holes or structural deterioration.
- Coating failure is widespread.
- Water is entering the building.
- Seams or flashing need major repairs.
- The existing material may contain lead or asbestos.
- Chemical stripping is required over a large area.
- Warranty coverage may be affected.
- You cannot identify the roof panel or coating system.
A contractor experienced with metal roof restoration can also determine whether full removal is actually necessary.
Sometimes the smarter solution is selective preparation, repair, priming, and recoating.
Other times the deterioration has progressed far enough that replacing damaged panels—or replacing the roof—is more practical than repeatedly coating it.
FAQs
Do I have to remove all the old coating from a metal roof?
Not always. Sound, firmly adhered coating may sometimes remain if the new coating manufacturer approves the existing system and adhesion testing confirms compatibility. Loose, peeling, contaminated, or incompatible material generally needs more extensive preparation.
Can I grind old roof coating off?
Grinding can remove stubborn material, but it generates dust and can damage galvanized or factory-coated metal. Use it only when appropriate for the substrate and coating specification, with proper dust control and protective equipment.
Is pressure washing safe for removing metal roof coating?
It can help remove loose coating and contamination, but pressure washing makes metal roofing slippery and may force water into vulnerable roof details. Use controlled pressure and follow the coating manufacturer’s preparation instructions.
What PPE should I wear when removing roof coating?
Protection depends on the removal method. Eye protection, gloves, protective clothing, suitable footwear, hearing protection, respiratory protection, and fall-protection equipment may all be necessary. Chemical products should be handled according to their label and Safety Data Sheet.
Can old metal roof paint contain lead?
Older painted surfaces may contain lead, particularly when the coating history of a pre-1978 property is unknown. Avoid uncontrolled sanding or grinding until the material has been evaluated.
Should I remove coating before repairing rust?
Loose coating normally has to be removed far enough to expose and evaluate corrosion. Light rust may be prepared and primed, while deeply corroded or perforated panels may require repair or replacement.
Is DIY metal roof coating removal worth it?
Small, safely accessible projects may be manageable for experienced homeowners. Large roofs, steep slopes, hazardous coatings, severe corrosion, chemical stripping, and extensive mechanical removal are usually better handled professionally.
Conclusion
Good roof coating removal safety is about controlling hazards while removing only what actually needs to come off.
Start by identifying the roof and coating system. Check older materials for potential hazards, establish safe roof access, use the least aggressive effective removal method, contain dust and debris, and protect the underlying metal.
Most importantly, do not let a coating project become a fall hazard or an expensive roof repair.
If the roof is steep, badly corroded, difficult to access, or covered with an unknown older coating, have a qualified roofing professional evaluate it before removal begins. The right preparation protects both you and the remaining life of your metal roof.
SEO METADATA (do not paste into the article):
Meta Title: Roof Coating Removal Safety for Metal Roofs
Meta Description: Learn roof coating removal safety for metal roofs, including fall protection, chemicals, rust, PPE, and safer removal methods.
URL Slug: roof-coating-removal-safety
Focus Keyword: roof coating removal safety
Secondary Keywords: metal roof coating removal, removing roof coating safely, metal roof surface preparation, roof coating stripping, roof coating removal PPE, old metal roof coating
Image Placeholders:
[IMAGE PLACEHOLDER 1]
Placement: After the introduction, before the “Quick Answer” section
Purpose: Visually demonstrate safe professional preparation for removing a coating from a residential metal roof.
Caption: Proper safety preparation should come before removing old coating from a metal roof.
Alt Text: Roof coating removal safety on a residential metal roof
Image Prompt: Photorealistic residential roofing scene showing a trained roofing professional preparing to remove deteriorated coating from a standing-seam metal roof, wearing a full-body harness connected to a secure roof anchor, safety glasses, gloves, work boots, and protective clothing. Visible peeling roof coating and light surface rust on several panels, tools secured safely away from the roof edge, dry clear weather, realistic U.S. suburban house, professional roofing photography, natural daylight, accurate metal roof details, no unsafe behavior, no text overlay.
Recommended Size: 1200×675 px
Suggested File Name: roof-coating-removal-safety-metal-roof.jpg
Suggested Surrounding Text: Safe coating removal begins with controlling fall hazards before scraping, washing, sanding, or applying chemical products.
[IMAGE PLACEHOLDER 2]
Placement: Inside the “Roof Coating Removal Methods Compared” section, immediately after the comparison table
Purpose: Help homeowners visually distinguish controlled coating removal from overly aggressive metal-roof preparation.
Caption: Use the least aggressive method that adequately prepares the metal roof for its next coating.
Alt Text: Safe metal roof coating removal methods and surface preparation
Image Prompt: Realistic close-up educational roofing image showing a metal roof panel divided naturally into preparation stages: loose peeling elastomeric coating being carefully removed with a hand scraper, a second area with light rust prepared using a hand wire brush, and a clean sound coated area left intact. Roofing professional wearing gloves and eye protection, realistic galvanized steel texture, controlled debris collection, detailed surface condition, daylight, high-resolution instructional photography, no text or labels.
Recommended Size: 900×600 px
Suggested File Name: safe-metal-roof-coating-removal-methods.jpg
Suggested Surrounding Text: The goal is a clean, stable, compatible surface—not automatically stripping every panel down to bare metal.