
Roof Estimator Tool Guide: How to Choose the Right One for Accurate Roofing Estimates

A roof estimator tool is only useful if it helps you make a better decision than you would have made with a tape, a sketch pad, and a guess. That means the tool has to do more than spit out a roof size. It should help you understand roof area, pitch, roofing squares, material quantities, waste, and—if you need it—labor and markup. If it can’t do those things reliably, it’s a calculator, not an estimating system.
For contractors, that distinction matters because a fast number is not the same thing as a bid-ready estimate. For homeowners, it matters because a “cheap roof” quote can look attractive right up until the labor, underlayment, flashing, and waste factor show up. The right tool should match the job you’re trying to do, not just the roof you’re looking at.
What a Roof Estimator Tool Actually Does
At the basic level, a roof estimator tool calculates roof area and converts that into roofing squares. One roofing square equals 100 square feet. That conversion is the backbone of most roofing estimates because shingles, underlayment, and many accessory quantities are tied to area.
A better tool goes a step further. It may estimate pitch, section count, eaves, valleys, and material takeoff. Some tools also estimate replacement cost by combining measurements with pricing assumptions. The Roof Quote Tool is described as an online roofing cost calculator that uses your address and aerial roof measurements to estimate roof size, pitch, and replacement cost, and it gives instant ballpark pricing. That’s useful for early planning, but “ballpark” is the key word. It is not the same as a final contract number.
What many tools do not calculate automatically is just as important. Tear-off, disposal, local labor rates, permit fees, decking repair, flashing upgrades, and site-specific access issues may need to be added separately. In other words, a tool can tell you the roof’s size and some material quantities, but it may not know what it will actually cost to remove the old roof or price the job in your market.
For material planning, even a simple calculator can save time. Calculator.net’s roofing calculator says it estimates roof area and the amount of materials necessary to construct a roof of a given area. That’s the kind of function you want when you’re checking how many squares a simple roof needs, or when you’re sanity-checking a bid before you send it.
Who Needs a Roof Estimator Tool
Different users need different levels of detail.
Contractors and roofing companies
If you’re bidding jobs for a living, the tool needs to support your workflow, not just your math. You want measurements, quantities, pricing, reports, and a way to move from estimate to proposal without retyping everything. iRoofing describes roofing estimating software as a way to connect measurements, products, quantities, and pricing in one workflow. That is a practical direction for contractors because every extra handoff creates room for mistakes.
DIY homeowners
If you’re planning a replacement or trying to budget before calling contractors, you usually need a simpler tool. You care about roof size, squares, and a rough cost range. You probably do not need CRM integration or multi-user permissions. You do need to know whether the number is based on roof footprint, aerial measurement, or a manual input you supplied.
Insurance or budget planners
If you’re using the estimate to set expectations, compare quotes, or prepare for a claim, the tool should be good at rough sizing and transparent about limits. You want a planning number, not a promise. That means clear assumptions, visible measurement inputs, and a way to verify the result later.
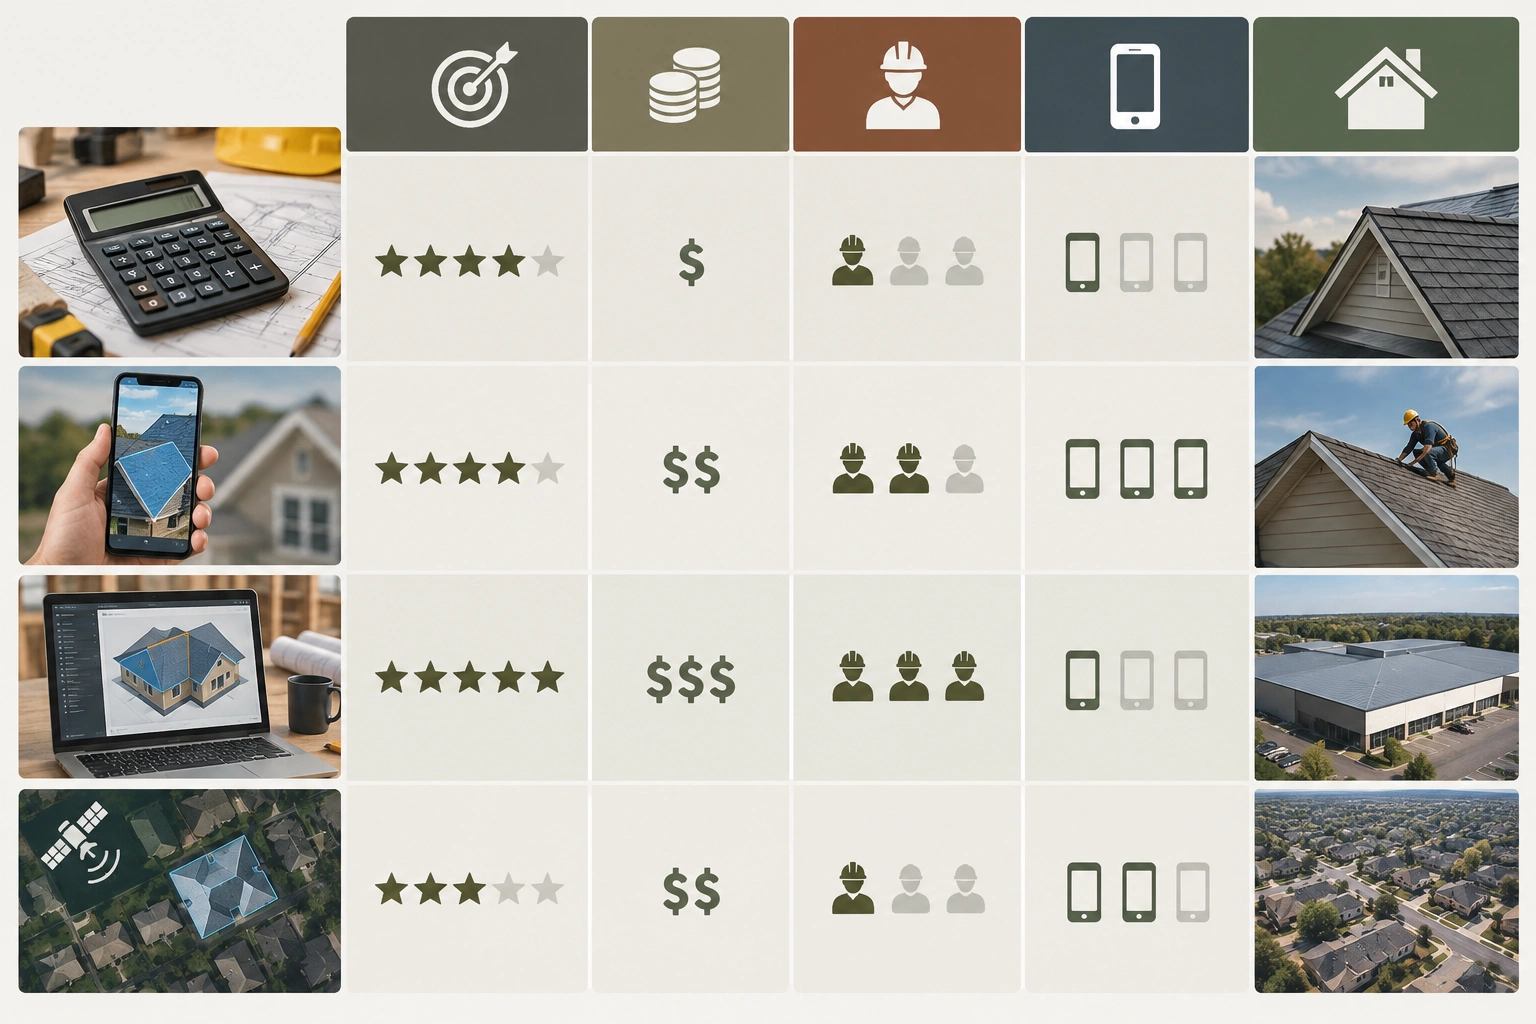
Types of Roof Estimator Tools: Calculator, App, Software, and Satellite-Based
Not all estimating tools work the same way. The category you choose affects accuracy, speed, and how much checking you still need to do.
| Tool type | Best for | Strengths | Weak spots |
|---|---|---|---|
| Calculator-style tool | Homeowners, quick planning | Fast, simple, low learning curve | Usually limited detail; may not include labor or markup |
| Mobile app | Contractors on the move | Handy on-site, faster lead response, easier field use | Can still rely on assumptions or incomplete data |
| Estimating software | Contractors and growing companies | Measurement, pricing, reports, and workflow in one place | More setup, often higher cost |
| Satellite-based estimator | Remote quoting, early-stage planning | Quick address-based measurement, no ladder required for first pass | Needs verification on complex roofs and unusual features |
Roofr says its Instant Estimator works from a phone and is designed to help contractors qualify leads and move faster while they’re out running jobs. That is a real advantage if you need to answer a prospect before the next contractor does. But speed is not the same thing as final verification.
Build-Folio’s free roof measurement tool combines available aerial or satellite-derived roof data into an area, pitch, and section estimate, then pairs that with a disclosed national planning range. It also notes that coverage varies and the building should be verified on site before ordering material. That is exactly the kind of caution a buyer should look for.
Key Buying Criteria: Inputs, Outputs, and Must-Have Features
Before you compare brands, compare outputs. A tool is only as good as the information it gives you.
Inputs you should expect
A solid roof estimator tool should ask for some combination of:
- Address or property location
- Roof dimensions or footprint
- Roof pitch
- Roof shape or sections
- Material type
- Waste factor
- Labor rate or pricing assumptions
If a tool doesn’t ask for pitch, be careful. Pitch changes the actual roof surface area. A low-slope roof and a steep roof with the same footprint do not require the same amount of material.
How to gather inputs before you estimate
To get a better estimate, gather the basics before you open the tool:
- Roof pitch: Use an existing drawing, a pitch gauge, or a pitch calculator if you have one. If you are estimating from the ground, treat the result as preliminary until you confirm it.
- Roof sections: Count each distinct plane or section separately, including additions, dormers, porches, and garage tie-ins. More sections usually mean more seams, flashing, and waste.
- Waste factor: Start with the tool’s default if it provides one, then adjust based on roof complexity and material type. Simple roofs usually need less waste than roofs with valleys, hips, or lots of cuts.
- Material choice: Shingle type, underlayment, and accessories can change quantities and cost assumptions.
- Job scope: Decide whether you are estimating replacement only or replacement plus tear-off, disposal, and repairs.
A few minutes of preparation can make the estimate much more useful, especially if you need to compare multiple quotes.
Outputs that matter
For real estimating work, look for:
- Roofing squares
- Square footage
- Linear feet of ridges, hips, valleys, and eaves
- Material quantities
- Waste-adjusted totals
- Labor estimate
- Total cost
- Report or export options
Invoicer.ai’s roofing calculator says it estimates linear feet of eaves and valleys from the roof footprint and converts that to rolls, noting that a 36-inch roll covers about 66 linear feet. That kind of output matters because accessory materials are often where a quick estimate goes wrong.
Features worth paying for
Pay for features that save rework, not features that look impressive in a demo. For contractors, that usually means reports, exports, mobile access, and integrations. For homeowners, it usually means clarity, not depth. If the tool tells you the roof is 32 squares but never explains the pitch, waste, or material assumptions, the number is incomplete.
How Accurate Roof Estimator Tools Are
Accuracy depends on three things: the data source, the roof shape, and the assumptions behind the math.
Aerial and satellite tools can be very useful for a first pass, especially on simple roofs. They are much less trustworthy when the roof has dormers, multiple valleys, additions, obstructions, or hard-to-see transitions. In those cases, the tool may still give you a useful starting point, but you should treat it as a draft.
Build-Folio is direct about this: coverage varies, and the subject building and dimensions should be verified on site before ordering material. That is the right standard to use for material ordering and final pricing. For budgeting or lead qualification, a rough digital estimate may be enough if the roof is simple and the assumptions are visible.
Here’s the practical rule:
– Budgeting or early planning: the tool is accurate enough if it gives you a reasonable roof size, a clear pitch assumption, and a transparent range.
– Lead qualification: the tool is accurate enough if it helps you decide whether the job is worth a site visit.
– Insurance planning: the tool is useful for a preliminary view, but claim-related pricing usually needs verification against the actual roof and scope of damage.
– Final bid or material ordering: verify on site before you commit.
Manual Measurement vs Digital Estimation
Manual measurement still has a place. It gives you direct confirmation of the roof’s shape, transitions, and problem areas. It also lets you see conditions that software can’t detect, like rot, damaged decking, or awkward tie-ins.
The downside is obvious: manual measuring takes time and puts someone on the roof. That means more labor and more exposure to fall risk, so safe access and proper fall protection matter. Digital tools reduce the need for repeat visits, but they do not eliminate the need for judgment.
A practical workflow is to use the digital tool first to size the job, then verify the questionable parts in person. That saves time without pretending the software knows everything.
Satellite-Based Estimates vs On-Site Measurement
Satellite-based tools are strongest when speed matters. You can get a roof estimate from an address, often before you’ve even scheduled a visit. That helps with lead response, budget conversations, and pre-qualification.
But satellite measurement has limits. Trees, shadows, roof overhangs, and complex geometry can all distort the result. Aerial data may also lag behind recent changes, such as additions or reroofed sections. If you’re quoting a simple ranch house, that risk is lower. If you’re pricing a steep, multi-plane roof with valleys and dormers, the risk is higher.
The decision rule is simple: use satellite for speed, then verify on site before you finalize pricing, materials, or claim-related scope.
Pricing Models and Hidden Costs
Price is not just the monthly subscription.
Some roof estimator tools are free, but free often means limited reports, fewer exports, or a narrower feature set. Others charge per report, per seat, or by plan tier. For example, a per-report model can work if you only need occasional measurements, while a monthly subscription may fit a contractor who estimates regularly. Feature tiers are also common: a basic plan might include roof measurements, while higher tiers add labor pricing, proposal tools, or integrations.
Roofr, for example, says its Instant Estimator works from your phone, while its broader site also references paid report pricing. That kind of model can make sense if you only need occasional reports, but it can get expensive if you’re running a high-volume sales operation.
Watch for these hidden costs:
- Report limits
- Extra user seats
- Add-on measurement reports
- Export restrictions
- CRM or proposal integrations
- Upgrade tiers for labor or pricing features
A tool is cheap only if it fits your volume. If you send one estimate a month, a paid platform may be overkill. If you send dozens, a free calculator can become a time sink.
Free Roof Estimator Tools vs Paid Software
Free tools are usually best for quick calculations, rough budgeting, and simple roofs. They often give you roof area, roofing squares, and a basic cost range. That may be enough for a homeowner who wants a ballpark number or a contractor who wants to qualify a lead quickly.
The tradeoff is that free tools often have real limits:
- Fewer export options
- Limited report detail
- Less control over labor, markup, and pricing assumptions
- Fewer integrations with CRM or proposal systems
- Less support for complex roofs or multi-user workflows
Paid software usually adds more than just branding. It commonly includes:
- More detailed measurement reports
- Labor and material pricing controls
- Proposal and export tools
- Team collaboration features
- Workflow integrations
- Better support for repeat estimating
That does not mean paid is always better. It means paid tools are more likely to be worth it when estimating is part of your business process, not just an occasional task.
Which Tool Is Best for Contractors vs Homeowners
Best fit for contractors
Contractors should favor tools that connect measurement to pricing and reporting. Look for a platform that handles the whole estimating flow: address lookup, roof measurement, material takeoff, labor, markup, and proposal output. That reduces duplication and makes it easier to keep bids consistent across your team.
Best fit for homeowners
Homeowners usually need a tool that answers three questions: How big is the roof, how many squares is that, and what is a rough replacement cost? A simple calculator or satellite-based estimate is often enough for budgeting and quote comparison. You do not need contractor-grade complexity unless you’re trying to self-manage a project.
Best fit for DIY planning
If you’re buying materials yourself, choose a calculator that shows both roof area and material quantities. The more clearly it separates footprint, pitch, and waste, the better. Otherwise you risk under-ordering shingles or underlayment.
How to Compare Roof Estimator Tools Before Buying
Use this checklist before you commit:
-
Does it estimate the kind of job you do?
A homeowner budgeting tool is not the same thing as a contractor bid system. -
Does it show how the number was built?
Look for pitch, roof sections, waste factor, and material assumptions. -
Can you verify the result?
You want the option to compare digital output with on-site measurements. -
Does it include the outputs you actually use?
If you need labor and markup, don’t buy a tool that only gives area. -
Is the price model workable for your volume?
Free is only good if it covers your use case. Paid is only good if it saves more time than it costs. -
Will it fit your workflow?
Mobile access, exports, and integrations matter if you’re using it every day.
If you can’t answer those six questions clearly, keep shopping.
If you’re a contractor
Prioritize bid-ready features: report exports, pricing controls, team access, and workflow integration. Also check whether the tool can handle repeat jobs efficiently, because consistency matters when multiple people are producing estimates.
If you’re a homeowner
Prioritize simplicity and transparency. The tool should clearly tell you whether the number is a rough budget estimate or a more detailed measurement. If it hides assumptions, it is less useful for comparing quotes.
Common Mistakes to Avoid When Choosing a Roof Estimator Tool
The biggest mistake is assuming every estimate is complete just because it looks polished.
Other common mistakes:
- Ignoring waste factor
- Forgetting that roof pitch changes material needs
- Assuming labor is included automatically
- Using a DIY app for bid-grade contractor work
- Trusting a satellite result on a complex roof without checking it
- Overlooking report limits or subscription tiers
- Confusing square feet with roofing squares
That last one causes more confusion than it should. A roof can be 2,400 square feet of footprint and still require more material once pitch and waste are added. If the tool doesn’t explain the difference, you need to.
When a Roof Estimator Tool Is Not Enough
A roof estimator tool is a planning tool. It is not a substitute for a full field review when the stakes are high.
Use extra caution when:
- The roof is complex
- The job is tied to an insurance claim
- You need a final bid, not a preliminary range
- The roof has multiple additions or hidden transitions
- Material ordering will happen before anyone verifies the structure
That’s where a tool can point you in the right direction, but a person still has to confirm the details. If you’re unsure, call in a roofing pro or verify the roof in person before you commit to pricing or materials.
For a deeper look at the measuring side of the workflow, see our guides on roof measurement tools and roof pitch calculators. If pitch is wrong, the estimate is wrong. If the measurement is wrong, everything built on top of it is wrong too.
FAQ
How accurate is a roof estimator tool?
It depends on the roof and the data source. Simple roofs with clear aerial views are usually better suited to digital estimates than complex roofs with dormers, valleys, or additions. For budgeting, a tool can be accurate enough if it gives a transparent range. For final bids, verify the roof on site.
Are free roof estimator tools worth using?
Yes, if you only need a rough estimate or a quick way to qualify a lead. Free tools usually have fewer features, fewer exports, and less control over pricing assumptions, so they are better for planning than for bid-ready estimating.
What roof inputs should I collect before estimating?
At minimum, gather the address, roof pitch, roof sections, material type, and a waste factor. If you are estimating a replacement, also decide whether tear-off, disposal, and repairs should be included.
Can I use satellite roof measurement for insurance claims?
You can use it as a starting point, but claim-related estimates often need on-site verification or adjuster-style review. Satellite data can help with planning, but it may not capture roof damage, recent changes, or hidden conditions.
Do contractors need paid roof estimator software?
Not always, but paid software is often more useful for contractors who estimate regularly. It usually adds reporting, pricing controls, exports, and workflow features that free tools tend to lack.
Final Take
A good roof estimator tool should help you move from roof size to usable numbers: squares, materials, waste, and cost. The right choice depends less on brand and more on workflow. If you need speed, satellite and mobile tools are useful. If you need bid-ready accuracy, choose software that lets you verify measurements, add pricing, and produce a clean report. If you’re a homeowner, keep it simple and use the tool for budgeting, not final pricing.
The best tool is the one that gives you a number you can defend.
