
How to Do Metal Roof Valleys: A Complete Homeowner’s Guide

Metal roof valleys are one of the most important parts of your roofing system. They handle large amounts of rainwater, melting snow, and debris, making proper installation essential. If you’re wondering how to do metal roof valleys, understanding the basics can help you avoid leaks, premature roof damage, and expensive repairs.
Whether you’re planning a new metal roof, replacing an older roof, or simply learning how your roofing system works, this guide explains the process in simple terms. You’ll learn how metal roof valleys are constructed, the materials involved, common mistakes to avoid, and when it’s best to hire a professional.
Quick Answer
How to do metal roof valleys involves installing a properly sized metal valley flashing over waterproof underlayment, aligning roofing panels correctly, leaving an appropriate drainage channel, and securing everything with compatible fasteners and sealants. Proper installation ensures water flows safely off the roof while preventing leaks and corrosion.
What Is a Metal Roof Valley?
A roof valley is the inside angle where two roof slopes meet. During rainfall, this area collects and directs large volumes of water toward the gutters.
Because valleys experience constant water flow, they require extra protection compared to the rest of the roof.
Metal roof valleys typically consist of:
- Ice and water shield
- Roofing underlayment
- Metal valley flashing
- Metal roofing panels
- Closure strips (when required)
- Compatible screws and sealants
A poorly installed valley is one of the most common causes of roof leaks.
Why Proper Valley Installation Matters
Correct valley installation helps:
- Prevent water infiltration
- Reduce the chance of ice dams
- Improve roof lifespan
- Handle heavy rainfall efficiently
- Protect roof decking from moisture damage
- Maintain manufacturer warranty requirements
According to the International Residential Code (IRC), roof assemblies must properly manage water intrusion through approved flashing methods.
Types of Metal Roof Valleys
Open Valley
An open valley leaves the center of the valley flashing visible.
Advantages
- Excellent drainage
- Easy maintenance
- Better debris removal
- Popular for standing seam roofs
Disadvantages
- Valley flashing remains visible
- Requires precise installation
Closed Valley
Roof panels overlap and conceal most of the valley.
Advantages
- Cleaner appearance
- Less exposed flashing
Disadvantages
- More difficult installation
- Greater chance of debris buildup
W-Valley
A W-shaped valley includes a raised center rib.
Benefits include:
- Separates water from both roof planes
- Reduces water crossing during heavy rain
- Ideal for larger roof sections
Materials You’ll Need
A typical metal roof valley installation includes:
| Material | Purpose |
|---|---|
| Ice and water shield | Waterproof protection |
| Synthetic underlayment | Secondary moisture barrier |
| Valley flashing | Directs water safely |
| Metal roofing panels | Roof covering |
| Roofing screws | Secure panels |
| Butyl tape or sealant | Water sealing |
| Metal snips | Cutting flashing |
| Chalk line | Layout accuracy |
| Measuring tape | Proper spacing |
Safety Comes First
Working on a roof is dangerous.
Before attempting any roofing work:
- Wear fall protection equipment.
- Use stable ladders.
- Avoid working during rain or high winds.
- Wear gloves to protect against sharp metal edges.
- Use eye protection while cutting metal.
The OSHA residential roofing safety guidance provides important recommendations for reducing fall hazards during roofing work.
If your roof is steep or more than one story high, professional installation is usually the safest choice.
Step-by-Step: How to Do Metal Roof Valleys
Step 1: Inspect the Roof Deck
Before installing anything:
- Check for rotten wood.
- Replace damaged decking.
- Ensure the roof surface is flat and solid.
Even small soft spots can eventually create leaks.
Step 2: Install Ice and Water Shield
Apply a self-adhering waterproof membrane centered over the valley.
Most manufacturers recommend extending the membrane well beyond each side of the valley.
This layer provides protection if wind-driven rain or ice backs up beneath the metal panels.
Step 3: Install Roofing Underlayment
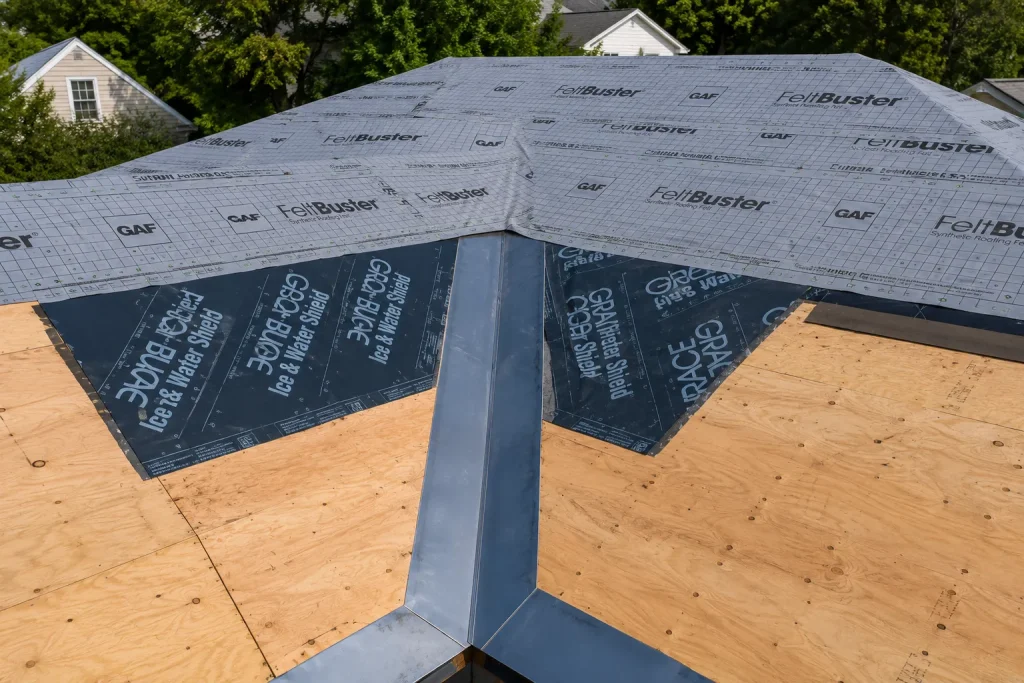
Lay synthetic underlayment over the rest of the roof.
Overlap each course according to manufacturer recommendations.
Smooth out wrinkles that could trap moisture.
Step 4: Position the Valley Flashing
Center the valley flashing directly over the valley line.
The flashing should:
- Stay straight
- Sit flat
- Extend beyond the eaves
- Overlap additional sections when needed
Fasten according to manufacturer instructions without restricting normal expansion and contraction.
Step 5: Cut Metal Panels Carefully
Each roofing panel should be measured and cut accurately.
Avoid:
- Jagged cuts
- Uneven spacing
- Excessively narrow panel edges
Many installers leave an open channel beside the center of the valley to improve drainage.
Step 6: Fasten the Panels
Secure panels using approved fasteners.
Do not:
- Drive screws into the center of the valley.
- Overtighten fasteners.
- Use incompatible metals that may cause galvanic corrosion.
Proper screw placement protects both waterproofing and panel movement.
Step 7: Seal Critical Areas
Apply butyl tape or approved sealant only where required.
Avoid excessive sealant.
Too much caulk often traps moisture instead of preventing leaks.
Expert Tip
Expert Tip: Before cutting expensive roofing panels, make a cardboard template of the valley angle. This simple step can reduce waste, improve fit, and save time during installation.
Open Valley vs Closed Valley
| Feature | Open Valley | Closed Valley |
|---|---|---|
| Water drainage | Excellent | Good |
| Debris removal | Easier | Harder |
| Appearance | Flashing visible | Cleaner look |
| Maintenance | Easier | More difficult |
| DIY friendliness | Better | More challenging |
Common Problems Caused by Poor Valley Installation
Improper installation can lead to:
- Roof leaks
- Rusting fasteners
- Standing water
- Ice dam formation
- Premature panel corrosion
- Rotting roof decking
- Mold growth inside the attic
Many of these issues develop slowly before becoming noticeable inside the home.
How Much Does Valley Installation Cost?
Costs depend on:
- Roof pitch
- Valley length
- Roof complexity
- Material quality
- Labor rates
- Geographic location
Installing a valley during a complete roof replacement is generally less expensive than repairing a leaking valley later.
When to Call a Roofing Professional

While experienced DIYers may handle simple roofing tasks, valley installation requires precision.
Consider hiring a roofing professional if:
- Your roof is steep.
- Multiple valleys intersect.
- You have standing seam metal roofing.
- The roof has existing leaks.
- Structural damage is present.
- Manufacturer warranty requirements must be maintained.
A qualified contractor can also identify hidden issues such as damaged decking or improper ventilation that may not be visible from the surface.
For additional guidance on moisture control and roof performance, the U.S. Department of Energy’s roofing and attic resources offer reliable homeowner information.
Common Mistakes Homeowners Should Avoid
- Installing valley flashing over damaged decking
- Skipping the ice and water shield
- Driving screws into the valley center
- Using incompatible metals
- Leaving too little drainage space
- Applying excessive roofing caulk
- Ignoring manufacturer installation instructions
- Walking directly on unsupported valley flashing
- Attempting repairs during wet weather
Maintaining Metal Roof Valleys
Regular maintenance helps extend roof life.
At least twice a year:
- Remove leaves and debris.
- Inspect flashing for movement.
- Check screws for loosening.
- Look for rust or corrosion.
- Examine sealant for cracking.
- Ensure gutters remain clear.
Preventive maintenance is far less expensive than repairing water damage.
FAQs
How wide should a metal roof valley be?
Most residential valleys use flashing between 18 and 24 inches wide, although larger roofs may require wider flashing based on water flow and manufacturer recommendations.
Should metal roof panels touch in the valley?
No. Most installations leave an open drainage channel so water can flow freely and debris is less likely to collect.
Can I install a metal roof valley myself?
If you have roofing experience, proper safety equipment, and a simple roof design, it may be possible. However, steep roofs and complex valleys are usually better handled by professionals.
What is the best sealant for metal roof valleys?
Manufacturers commonly recommend butyl tape or compatible roofing sealants designed specifically for metal roofing systems.
How long do metal roof valleys last?
When installed correctly using quality materials, metal roof valleys often last as long as the metal roofing system itself, which may be 40 to 70 years depending on the material and maintenance.
Why do metal roof valleys leak?
Leaks usually result from improper flashing installation, missing waterproof membrane, incorrect fastener placement, damaged sealant, or debris blocking water flow.
Conclusion
Learning how to do metal roof valleys gives homeowners a better understanding of one of the most critical parts of a metal roofing system. Proper waterproofing, correctly installed valley flashing, accurate panel cuts, and regular maintenance all work together to prevent leaks and extend the life of your roof.
If you’re planning a roofing project, take the time to evaluate your roof’s complexity and prioritize safety. For simple inspections and maintenance, understanding your roof valley can help you spot problems early. For new installations or complex repairs, hiring a qualified roofing professional is often the best investment to protect your home for decades to come.