
How to Flash a Chimney on a Metal Roof: A Step-by-Step Homeowner’s Guide

A leaking chimney is one of the most common roofing problems homeowners face, especially on metal roofs. If water is getting into your attic or staining the ceiling around the chimney, damaged or improperly installed flashing is often the culprit. Learning how to flash a chimney on a metal roof helps you understand what a proper installation should look like, whether you’re planning a DIY repair or hiring a contractor.
This guide explains how chimney flashing works, the materials involved, installation steps, common mistakes, costs, safety considerations, and when it’s best to call a professional.
Quick Answer
To flash a chimney on a metal roof, install step flashing along the sides, apron flashing at the front, and back (cricket or saddle) flashing on the uphill side. Seal all joints properly, integrate the flashing with the metal roofing panels, and install counter flashing into the chimney mortar joints to prevent water intrusion. Proper installation is critical because even small gaps can lead to serious roof leaks.
Why Chimney Flashing Matters on a Metal Roof
Your chimney interrupts the smooth surface of the roof. Every time rain or melting snow flows downhill, it encounters this obstacle.
Without properly installed flashing:
- Water seeps beneath roofing panels.
- Roof decking begins to rot.
- Mold can develop inside the attic.
- Insulation loses effectiveness.
- Structural repairs become much more expensive.
Unlike asphalt shingles, metal roofing expands and contracts as temperatures change. That movement makes proper flashing design even more important.
According to the National Roofing Contractors Association (NRCA), flashing is one of the most critical components of a long-lasting roofing system.
How Chimney Flashing Works
Flashing is thin metal that creates a waterproof transition between the chimney and the roof.
A complete chimney flashing system typically includes:
- Apron flashing at the front
- Step flashing along both sides
- Back flashing (cricket flashing) behind the chimney
- Counter flashing embedded into the chimney masonry
Each piece directs water away from vulnerable areas.
Important: Caulk alone is never a permanent substitute for proper flashing.
Types of Flashing Used on Metal Roofs
| Flashing Type | Purpose | Typical Material |
|---|---|---|
| Apron Flashing | Directs water around the front | Galvanized steel, aluminum, copper |
| Step Flashing | Protects roof sides | Steel or aluminum |
| Back Flashing (Cricket) | Diverts uphill water | Steel |
| Counter Flashing | Covers upper flashing edges | Steel or copper |
Using compatible metals helps prevent galvanic corrosion, which occurs when dissimilar metals react with moisture.
Materials and Tools You’ll Need
Common materials include:
- Metal flashing pieces
- Butyl tape
- High-quality roofing sealant
- Roofing screws with neoprene washers
- Closure strips
- Ice and water shield (if replacing roofing)
Basic tools include:
- Tape measure
- Tin snips
- Screw gun
- Caulking gun
- Pry bar
- Chalk line
- Safety harness
- Ladder
According to the OSHA residential roofing safety guidance, fall protection should always be used when working on roofs.
Step-by-Step: How to Flash a Chimney on a Metal Roof
Step 1: Inspect the Existing Flashing
Before removing anything:
- Look for rust
- Loose flashing
- Missing sealant
- Cracked mortar
- Water stains in the attic
Sometimes only the flashing needs replacement—not the entire roof.
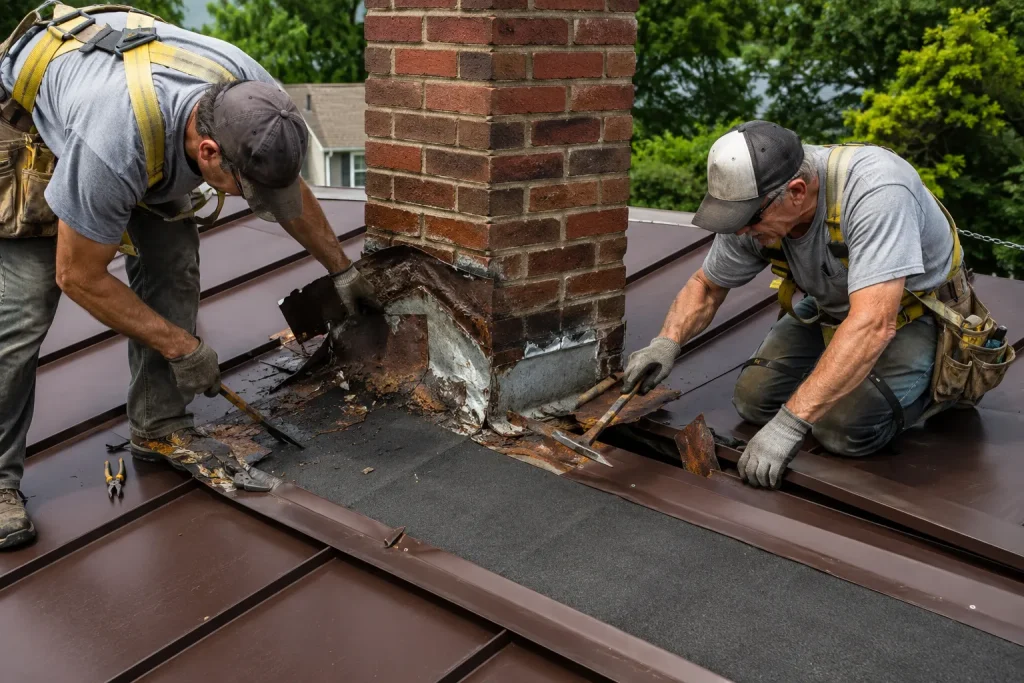
Step 2: Remove Old Flashing
Carefully remove:
- Existing flashing
- Old sealants
- Loose fasteners
- Damaged roofing components around the chimney
Avoid damaging reusable metal roofing panels.
Step 3: Install Waterproof Underlayment
Install self-adhering waterproof membrane around the chimney base.
This extra layer provides backup protection if water ever bypasses the flashing.
Step 4: Install Apron Flashing
Position apron flashing along the lower side of the chimney.
It should:
- Extend over the roofing panel
- Direct water downhill
- Fit tightly against the chimney
Avoid excessive sealant. Proper overlap is more important.
Step 5: Install Step Flashing Along Both Sides
Each flashing piece should overlap the previous one.
Proper step flashing:
- Follows the roof slope
- Allows thermal movement
- Directs water away naturally
Never rely solely on screws to stop leaks.
Step 6: Install Back Flashing (Cricket)
If the chimney is wider than about 30 inches, install a cricket behind it.
A cricket:
- Diverts heavy rain
- Prevents snow buildup
- Reduces standing water
The International Code Council recommends proper water diversion around roof penetrations in accordance with applicable building codes.
Step 7: Install Counter Flashing
Counter flashing covers the upper edges of all flashing pieces.
It is installed by:
- Cutting a shallow groove into mortar joints.
- Inserting the flashing edge.
- Sealing the groove.
- Fastening securely.
This creates the final waterproof barrier.
Step 8: Seal and Inspect
Check:
- Fasteners
- Overlaps
- Sealant
- Flashing alignment
Run water over the area with a garden hose to verify there are no leaks before considering the project complete.
Expert Tip
Expert Tip: When replacing flashing on an older metal roof, replace any rusted fasteners within a few feet of the chimney at the same time. Aging fasteners are a common source of future leaks, even if the new flashing is installed correctly.
DIY vs Professional Installation
| DIY | Professional |
|---|---|
| Lower upfront cost | Higher initial investment |
| Suitable for experienced homeowners | Recommended for most homeowners |
| Greater risk of leaks | Better workmanship warranties |
| Safety risks | Proper fall protection equipment |
| May void roofing warranty | Helps preserve manufacturer warranties |
For most homeowners, professional installation provides greater long-term value.
Typical Costs
Several factors affect flashing replacement costs:
- Chimney size
- Roof pitch
- Metal roofing type
- Accessibility
- Flashing material
- Existing damage
Approximate U.S. costs:
| Project | Typical Cost |
|---|---|
| Minor flashing repair | $300–$700 |
| Complete chimney flashing replacement | $700–$1,500 |
| Flashing with chimney cricket | $1,200–$2,500+ |
If significant water damage is discovered, repairs may increase the overall project cost.
Warning Signs Your Chimney Flashing Needs Attention
Watch for:
- Water stains on ceilings
- Damp attic insulation
- Rust around flashing
- Loose flashing pieces
- Cracked sealant
- Mold near the chimney
- Dripping during heavy rain
Addressing these signs early can prevent much larger roofing repairs.
When to Call a Roofing Professional

While some experienced DIYers may replace simple flashing, many chimney flashing projects require professional expertise.
Call a roofing contractor if:
- The roof is steep or difficult to access.
- The chimney has extensive masonry damage.
- Water has already entered the attic.
- The metal roof panels need removal.
- You notice structural wood rot.
- The flashing has failed multiple times.
- Your roof is still under warranty.
Professionals can also identify hidden issues that homeowners may overlook, such as deteriorated underlayment or improperly installed roofing panels.
Common Mistakes Homeowners Should Avoid
- Using excessive caulk instead of proper flashing.
- Mixing incompatible metals that can corrode over time.
- Skipping counter flashing.
- Forgetting to install a chimney cricket on wide chimneys.
- Driving screws through areas that collect water.
- Ignoring damaged underlayment.
- Working without fall protection.
- Delaying repairs after noticing small leaks.
Even a minor flashing mistake can lead to thousands of dollars in water damage over time.
FAQs
How long does chimney flashing last on a metal roof?
Properly installed flashing often lasts 20–40 years, depending on the material, climate, and roof maintenance.
Can I seal chimney flashing instead of replacing it?
Small gaps may be temporarily sealed, but deteriorated or improperly installed flashing usually requires replacement for a lasting repair.
What is the best material for chimney flashing?
Galvanized steel, aluminum, and copper are common choices. The best option depends on your roofing material, budget, and local climate.
Does every chimney need a cricket?
Not always. However, chimneys wider than about 30 inches on the uphill side of a roof generally benefit from a cricket to divert water and debris.
Why does my chimney leak only during heavy rain?
Heavy rain can expose weaknesses in flashing, counter flashing, or sealant that lighter rainfall may not reveal.
Can improper flashing damage my attic?
Yes. Water entering through failed flashing can rot roof decking, damage insulation, promote mold growth, and stain interior ceilings.
Should flashing be replaced when installing a new metal roof?
In most cases, yes. Replacing old flashing during a roof replacement helps ensure a watertight system and reduces the risk of future leaks.
Conclusion
Understanding how to flash a chimney on a metal roof helps homeowners recognize quality workmanship and make informed decisions about roof maintenance. A complete flashing system—including apron, step, back, and counter flashing—works together to keep water out and protect your home’s structure.
While experienced DIYers may be able to handle simple flashing repairs, chimney flashing is one of the most critical waterproofing details on any roof. If you notice leaks, rust, loose flashing, or signs of water damage, schedule an inspection before the problem worsens. Investing in proper flashing today can help prevent expensive repairs and extend the life of your metal roof for many years.