
Which Side of Metal Roofing Overlaps? A Homeowner’s Guide to Correct Panel Direction

Metal roofing panels may look nearly identical on both sides, but their edges are usually designed to connect in one specific direction. Installing the wrong edge on top can create gaps, weaken the joint, and increase the chance of wind-driven rain entering the roof.
So, which side of metal roofing overlaps? The answer depends on the panel profile. One edge is the overlap edge, while the other is the underlap edge. This guide explains how to identify them, how wind direction affects panel placement, and when installation should be left to a roofing professional.
Quick Answer
Metal roofing does not have one universal left or right overlap. The panel’s designated overlap rib goes on top of the underlap rib. In most exposed-fastener installations, begin at the downwind roof edge and work toward the prevailing wind so the open side of each lap faces away from wind-driven rain. Always confirm the panel manual.
There Is No Universal Left or Right Overlap
Metal roofing panels are not all manufactured the same way. Depending on the product, the overlap edge may be on the left side or the right side when the panel is facing upward.
For that reason, homeowners should not follow a general rule such as:
- “Always overlap the right side.”
- “The left edge always goes underneath.”
- “Install every panel from left to right.”
Those instructions may be correct for one product and wrong for another.
The correct rule is that the manufacturer-designated overlap edge must cover the underlap edge of the previously installed panel. The installation direction is then adjusted according to the roof layout, panel design, and prevailing weather.
What Are the Overlap and Underlap Edges?
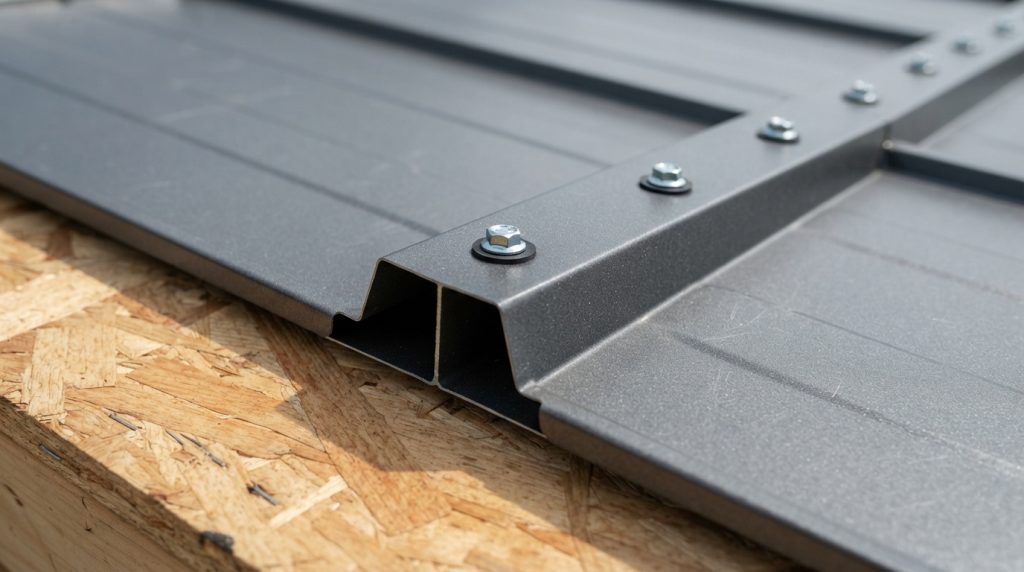
The underlap edge is installed first. It remains underneath the edge of the next panel.
The overlap edge is placed over the underlap edge. Together, the two edges create a side lap that helps prevent water from reaching the roof deck.
On some panels, the difference is obvious. One edge may have a larger rib that fits directly over a smaller rib. On other products, the edges may look almost identical until they are placed together.
How to Identify Which Edge Goes on Top
Before panels are lifted onto the roof, place two of them next to each other on a flat surface. Align the ribs and test how the edges nest together.
The correct overlap normally creates:
- A smooth, fully nested rib
- The intended panel coverage width
- No large gap beneath the upper edge
- Straight ribs running from the eave to the ridge
- A secure location for side-lap fasteners, when required
The wrong orientation may leave the rib raised, twisted, unusually wide, or difficult to fasten.
Look for the Underlap Rib
The underlap edge may have one or more identifying features:
- A smaller or lower rib
- A narrow flat flange
- A purlin-bearing leg
- An anti-siphon or drainage groove
- Factory markings on the underside
- Prepunched fastening locations
For example, the Metal Sales PBR-Panel installation guide instructs installers to place sealant on the underlap rib of the first panel and then position the next panel over it. The upper lapping rib is secured through the sealant and underlap according to the specified fastening pattern.
Check for a Purlin-Bearing Leg
PBR panels often have a special leg along one edge that rests against the framing or roof deck. That edge normally goes underneath the adjacent panel.
The Union Corrugating PBR, R, and IR panel guide explains that the non-purlin-bearing edge of a PBR panel laps over the purlin-bearing edge. It also notes that symmetrical R panels may allow either edge to overlap, provided the installation direction properly addresses prevailing wind. (unioncorrugating.com)
Check for a Siphon Groove
Some metal roofing profiles have a small groove near one edge. This groove is designed to help interrupt capillary movement—the tendency of water to move into a narrow joint.
Do not assume that the grooved edge always goes on top. Panel designs differ.
For example, the Metal Sales 5V-Crimp installation guide states that its siphon-groove edge must be overlapped by the adjacent non-siphon-groove edge. That instruction applies to that particular product and should not automatically be used for another profile.
| Panel feature | Typical position | How to confirm |
|---|---|---|
| Smaller underlap rib | Under the next panel | Compare two panels and check the manual |
| Larger nesting rib | Over the previous panel | Confirm that it fully covers the underlap |
| Purlin-bearing leg | Usually underneath | Look at the panel profile drawing |
| Siphon or drainage groove | Product-specific | Follow the manufacturer’s exact instructions |
| Symmetrical panel edges | Either edge may fit | Choose direction based on wind and manual guidance |
| Standing seam male/female edges | Female edge usually snaps or seams over male edge | Use the system-specific installation sequence |
Never identify the overlap side only by looking at the painted surface. Both edges may have the same finish even though their shapes and functions are different.
Should the Overlap Face Toward or Away From the Wind?
In most exposed-fastener systems, the open side of the side lap should face away from the prevailing direction of wind-driven rain.
A common installation approach is to:
- Start at the downwind or leeward rake edge.
- Install the first panel square with the eave.
- Work across the roof toward the prevailing wind.
- Place each new panel’s overlap edge over the previous panel’s underlap edge.
This arrangement makes it harder for strong wind to push rain directly into the opening of the joint. Both 5V-Crimp and PBR installation guidance commonly recommend orienting panel laps away from prevailing wind or driving rain.
A Simple Wind-Direction Example
Suppose storms normally approach your house from the west.
The installer may begin at the eastern, downwind side of that roof plane and work toward the west. Each new panel then covers the open edge of the previous lap, helping shield the joint from western winds.
However, roof shape, panel geometry, valleys, additions, and manufacturer instructions may require a different starting point. Wind direction is an important planning factor, but it does not override the panel’s designed overlap configuration.
Expert Tip: Before ordering or installing panels, download the installation guide for the exact panel name and manufacturer. Similar-looking panels can have different lap, sealant, and fastening requirements.
Side Laps and End Laps Are Different
Homeowners sometimes use the word “overlap” for two different joints.
Side Lap
A side lap connects panels placed next to each other across the width of the roof. These joints normally run from the eave toward the ridge.
Most exposed-fastener panels overlap by one designated rib, but the actual coverage and joint shape depend on the panel profile.
End Lap
An end lap is used when one panel is not long enough to extend from the eave to the ridge.
At an end lap, the upper panel must overlap the lower panel. This arrangement allows rainwater to flow over the joint rather than against it.
The required end-lap distance may depend on:
- Roof slope
- Panel profile
- Manufacturer requirements
- Local wind and rain exposure
- Sealant placement
- Supporting framing beneath the lap
For example, the Metal Sales PBR guide shows an upper panel overlapping the lower eave panel by at least six inches for that specified system. That measurement should not be treated as a universal requirement for every metal roof.
A Practical Process for Confirming Panel Direction

Metal roofing should be planned before the first panel is fastened. Once several panels have been installed, correcting the overlap direction can require removing a large section of the roof.
1. Identify the Exact Panel Product
Find the manufacturer, profile name, gauge, coverage width, and order documents.
Descriptions such as “corrugated metal” or “ribbed roofing” are not specific enough. Products with similar appearances may connect differently.
2. Read the Installation Manual
Locate the diagrams for:
- Panel cross-section
- Side-lap detail
- First-panel placement
- Installation sequence
- Fastener pattern
- Sealant requirements
- Eave and rake trim
Follow the project drawings when they provide details that are more specific than the general product manual.
3. Check the Roof’s Prevailing Weather Direction
Determine where strong storms and wind-driven rain usually come from. The contractor can then plan the starting rake so the lap openings are protected as much as possible.
4. Dry-Fit Two Panels
Place two panels together before fastening anything. Confirm that the ribs nest correctly and that their combined width matches the intended coverage.
For example, two panels with a 36-inch coverage width should increase the covered roof width by approximately 36 inches per added panel—not necessarily by the full physical sheet width.
5. Establish a Square Starting Line
The first panel must be square with the eave and roof plane. A small error at the first panel becomes much larger as additional panels are installed.
Contractors commonly compare measurements at several points rather than assuming the roof edge is perfectly straight.
6. Install Sealant Only Where Specified
Some side laps require butyl tape or another approved sealant. Others rely mainly on the panel geometry and seam design.
Do not apply a random bead of exposed caulk along the outside of every seam. Surface caulk may trap water, collect dirt, restrict movement, or hide an incorrectly assembled joint.
7. Use the Correct Fastening Pattern
Side-lap screws, sometimes called stitch screws, join the two panel edges. Their spacing and location are product-specific.
Improper fastener installation can cause problems:
- Underdriven screws may leave loose washers.
- Overdriven screws may crush or split sealing washers.
- Angled screws may create openings around the washer.
- Missing stitch screws may allow the lap to separate in wind.
- Too many fasteners may deform the panel.
What Happens If Metal Roofing Is Overlapped the Wrong Way?
A backward side lap may still appear to fit, especially on symmetrical or lightly formed panels. Problems may not become visible until the roof experiences heavy rain or high winds.
Possible consequences include:
Wind-Driven Water Entry
Wind can force water toward the open edge of a poorly oriented joint. Water may then move past the rib, sealant, or fasteners.
Capillary Leaks
Small gaps can draw water into the seam. This is more likely when the panel’s drainage or siphon-control feature is placed incorrectly.
Loose or Lifted Panel Edges
A lap facing directly into prevailing winds may experience more pressure. Poor fastening can make the edge flutter, separate, or become damaged.
Uneven Panel Alignment
An incorrect lap may change the effective panel coverage. Ribs can gradually move out of alignment with the eave, ridge, or opposite roof slope.
Premature Sealant Failure
Sealant cannot compensate for panel edges that were assembled incorrectly. Movement and trapped moisture may cause it to separate.
Warranty Problems
Manufacturers may require installation according to their manuals, approved details, and fastening patterns. Incorrect panel orientation could affect a workmanship claim or manufacturer-backed warranty.
Warning Signs That Existing Panels May Be Lapped Incorrectly
Homeowners should not climb onto the roof to inspect side laps closely. Many signs can be identified from the ground, attic, or by a professional inspection.
Watch for:
- Leaks that follow a long vertical panel seam
- Water stains appearing during windy rain but not light rain
- Lifted or fluttering panel edges
- Side-lap screws that repeatedly loosen
- Wide or uneven seams
- Ribs that do not align at the ridge
- Excessive exterior caulk covering every joint
- Rust or moisture marks beneath a side lap
- Panels that gradually move out of square
A leak near a seam does not automatically prove that the overlap is backward. The actual source may be a loose fastener, failed sealant, flashing defect, condensation problem, or roof penetration farther upslope.
Does Every Metal Roof Use Overlapping Side Laps?
No. The connection method depends on the roofing system.
Exposed-Fastener Panels
Corrugated, agricultural, R-panel, PBR, and 5V-Crimp products commonly use overlapping ribs. Screws remain visible after installation.
Correct lap direction, washer compression, sealant placement, and fastener spacing are especially important.
Snap-Lock Standing Seam Panels
These panels normally have male and female edges. One edge is attached with concealed clips or fasteners, and the next panel snaps over it.
The seam direction is determined by the panel system and installation sequence rather than a general left-or-right rule.
Mechanically Seamed Panels
The edges are joined and then closed with a mechanical seaming tool. These systems require specialized equipment and precise installation.
Symmetrical Standing Seam Panels
Some modern standing seam systems have symmetrical joints that allow greater installation flexibility. Even then, the installer must follow the system’s clip, seam, and weatherproofing details.
Cost, Quality, and Durability Considerations
Choosing the correct panel overlap direction usually does not increase material cost. It mainly requires careful planning before installation begins.
Correcting the problem later can be expensive because the contractor may need to:
- Remove ridge or rake trim
- Back out hundreds of fasteners
- Replace damaged sealing washers
- Remove and reposition multiple panels
- Replace bent or punctured sheets
- Reapply approved sealant
- Repair wet underlayment or decking
The quality of the installation matters as much as the metal itself. A premium panel can leak early when laps, fasteners, flashing, or penetrations are installed poorly. A properly assembled system is more likely to resist water, wind, and repeated expansion and contraction.
When comparing contractor estimates, ask whether the proposal includes:
- The exact panel manufacturer and profile
- Product-specific installation details
- Underlayment and flashing specifications
- Side-lap and end-lap sealant
- Fastener type and placement
- Vent, chimney, and skylight details
- Workmanship warranty terms
- Removal of metal shavings and installation debris
Roofing Safety Comes First
Metal roof panels can be slippery, especially when wet, dusty, frosty, or covered with loose metal shavings. Unsecured panels can also slide or fail under a person’s weight.
The OSHA construction fall-protection standard generally requires fall protection for residential construction workers exposed to falls of six feet or more. OSHA identifies guardrails, safety nets, and personal fall-arrest systems among the approved forms of protection for applicable roofing work. (OSHA)
Do not climb onto a metal roof simply to determine which edge overlaps. Panel profiles should be identified from leftover materials, order documents, manufacturer diagrams, attic observations, or a professional roof inspection.
When to Call a Roofing Professional
Professional installation or inspection is the better decision when:
- The panel manufacturer or profile is unknown
- The roof is steep, high, wet, or difficult to access
- Panels are long, heavy, or easily bent
- The roof includes valleys, dormers, skylights, or chimneys
- End laps are required
- Existing side laps appear reversed
- Water is entering during wind-driven rain
- Roof decking may be damaged
- Local permits or engineered fastening patterns apply
- A manufacturer warranty requires approved installation
- Several completed rows would need to be removed
A qualified metal roofing contractor can compare the installed joint with the product profile, test suspicious areas, and determine whether the problem requires resealing, refastening, partial panel removal, or broader replacement.
Common Mistakes Homeowners Should Avoid
- Assuming the right or left edge always overlaps. Panel direction varies by product.
- Ignoring the installation manual. Similar-looking profiles may have different underlap features.
- Starting from the wrong rake. This can leave lap openings exposed to prevailing wind-driven rain.
- Confusing side laps with end laps. Upper panels must cover lower panels at horizontal end joints.
- Using exterior caulk as the main repair. Caulk cannot correct a reversed or poorly nested seam.
- Overdriving screws. Crushed washers may split and lose their seal.
- Fastening before checking square. Misalignment becomes harder to correct with every new panel.
- Walking on unsecured panels. Panels can shift, bend, or slide unexpectedly.
- Mixing components from different systems. Closures, screws, sealants, and trim should be compatible with the selected panel.
- Hiring based only on the lowest estimate. Missing installation details may lead to leaks and costly corrections later.
FAQs
Which edge of corrugated metal roofing goes on top?
The edge designed as the overlap rib goes on top of the adjacent underlap rib. Because panel shapes vary, compare the profile edges and check the manufacturer’s installation diagram rather than assuming a universal left or right side.
Should metal roof overlaps face away from the wind?
In most exposed-fastener installations, the open side of the lap should face away from prevailing wind-driven rain. Installers commonly begin at the downwind rake and work toward the prevailing wind, unless the manufacturer specifies another sequence.
Does the grooved edge of metal roofing go under or over?
It depends on the panel design. A drainage or siphon groove may form part of the underlap on one product but function differently on another. Follow the profile drawing for the exact panel.
How much should metal roofing overlap on the side?
Many exposed-fastener panels overlap by one full rib. However, the usable coverage width, sealant, and fastener requirements are product-specific. Do not add an extra rib unless the manufacturer or engineered plan requires it.
Which panel goes on top at an end lap?
The upper, ridge-side panel goes on top of the lower, eave-side panel. This allows rainwater to flow down and over the joint. The required lap length and sealant pattern must follow the manufacturer’s instructions.
Can metal roofing be installed in either direction?
Some symmetrical panels can be installed in either direction. Many PBR, 5V, corrugated, and standing seam products have designated edges and cannot be reversed without changing how the joint performs.
Can backward metal roof panels be repaired without replacement?
Sometimes a contractor can correct a limited area by removing fasteners and repositioning panels. If many rows are reversed, panels may need extensive removal, and damaged sheets, washers, sealant, or trim may require replacement.
Conclusion
There is no universal rule that the left or right side of every metal roofing panel must overlap. To determine which side of metal roofing overlaps, identify the designated overlap rib, place it over the underlap rib, and confirm the direction with the exact manufacturer’s installation guide.
For exposed-fastener roofing, the laps should usually be arranged so their open sides face away from prevailing wind-driven rain. The first panel must also be square, correctly sealed, and fastened according to the approved pattern.
Before installation begins, dry-fit two panels and verify the profile details. For an existing roof, unexplained seam leaks, reversed laps, or loose panel edges should be evaluated by a qualified metal roofing contractor before water causes more serious damage.