
How to Seal Metal Roof Seams: A Practical Homeowner’s Guide

A leaking metal roof often makes homeowners assume that an entire panel has failed. In reality, water usually enters through a seam, end lap, fastener, flashing joint, or roof penetration.
Learning how to seal metal roof seams can help you understand whether the problem needs a small repair, professional seam reconstruction, or a larger roof-restoration project. The correct method depends on your roof type, the condition of the metal, and where the original waterproofing system has failed.
This guide explains the different seam types, suitable sealants, repair steps, warning signs, costs, safety concerns, and situations where a roofing contractor should handle the work.
Quick Answer
To seal metal roof seams, first locate the actual leak, clean and dry the metal, remove failed sealant, and repair corrosion. Whenever possible, reopen the joint and install manufacturer-approved butyl tape or sealant between the metal layers. Refasten the seam correctly and use exterior sealant only where the roof manufacturer recommends it.
Why Metal Roof Seams Begin to Leak
Metal panels themselves rarely develop random leaks in the middle of an undamaged surface. Problems are more common where panels, flashing, fasteners, and roof accessories connect.
Metal expands when it becomes hot and contracts when it cools. This repeated movement can slowly weaken old sealant, loosen fasteners, and place stress on panel joints.
Common causes of leaking seams include:
- Missing or poorly installed butyl tape
- Loose, backed-out, or stripped fasteners
- Failed rubber washers
- Inadequate panel overlap
- Separation at horizontal end laps
- Dried, cracked, or peeling sealant
- Rust between overlapping metal surfaces
- Storm or hail damage
- Foot-traffic damage
- Incorrect repairs made with roofing cement
- Improper flashing around vents, chimneys, or walls
A seam repair will last only when the underlying cause is corrected. Simply covering the visible gap may hide the problem without stopping water from entering underneath.
Identify the Type of Metal Roof Seam
Before choosing a repair product, determine what type of seam you have.
Standing Seams
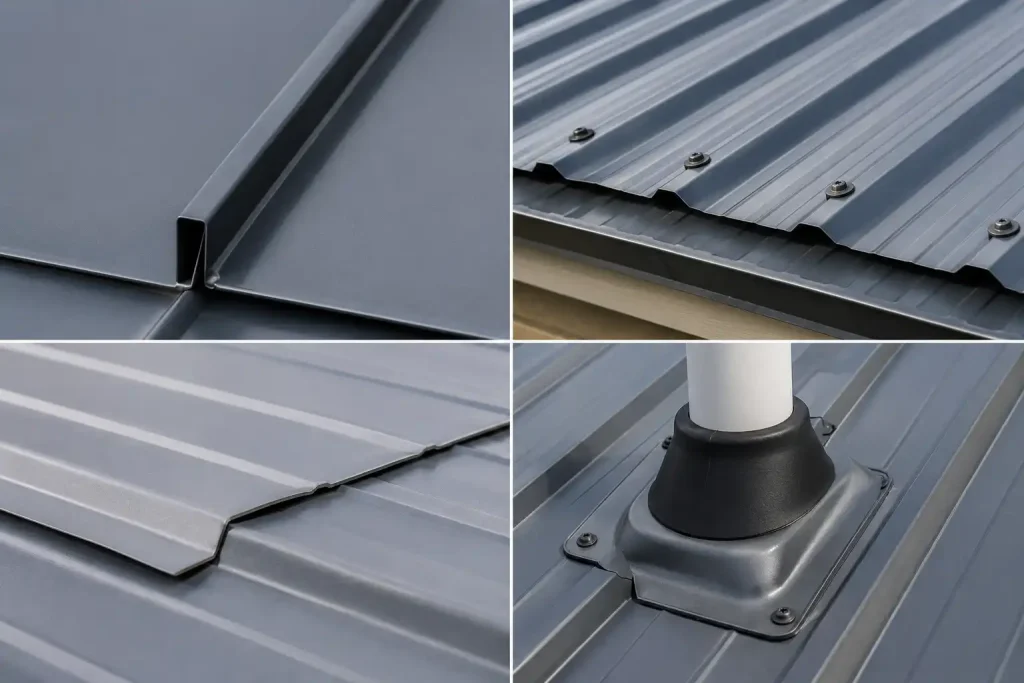
A standing seam roof has raised vertical ribs running from the eave toward the ridge. The panel edges are folded or mechanically locked together, while most fasteners remain concealed below the panels.
These seams are part of an engineered system. Some contain factory-applied sealant, while others depend mainly on the shape and mechanical locking of the seam.
The Metal Construction Association’s roof-seaming guidance explains that sealant requirements vary by seam design. It recommends confirming that any tape or liquid sealant is specifically intended for the metal roofing system. (Metal Construction Association)
Do not automatically cover a standing seam with a thick line of caulk. A separated or improperly folded seam may need to be reseamed with special equipment rather than surface-sealed.
Exposed-Fastener Lap Seams
Corrugated and ribbed metal roofs often have panels that overlap along their sides. Screws with rubber washers hold the panels to the roof structure.
The waterproofing material is normally placed between the overlapping sheets, where pressure from the fasteners compresses it.
If the panels have separated, the lasting repair is usually to:
- Remove or loosen the appropriate fasteners.
- Carefully lift the overlapping edge.
- Remove failed sealant and debris.
- Install new butyl tape or approved sealant.
- Reassemble and refasten the lap correctly.
Horizontal End Laps
An end lap occurs where the lower end of one panel overlaps the upper end of another panel on the same roof slope.
Because rainwater flows across these joints, the upper panel must overlap the lower panel in the direction of drainage. Sealant supports this arrangement but should not replace a correctly formed overlap.
Manufacturer guidance from MBCI emphasizes that metal-roof details should use proper drainage and overlapping construction as the first defense against water. Sealant should generally act as a secondary protection rather than the only barrier. (MBCI)
Flashing and Trim Seams
Metal flashing is installed around:
- Chimneys
- Sidewalls and headwalls
- Valleys
- Ridges and hips
- Skylights
- Vent pipes
- Roof curbs
- Eaves and rake edges
A leak near a panel seam may actually begin at nearby flashing. Water can travel along the underside of a panel before appearing inside the house.
Warning Signs That a Seam Needs Attention
Look for both exterior and interior evidence.
Exterior Warning Signs
- A visible opening between panels
- Sealant pulling away from the metal
- Cracked or hardened caulk
- Rust stains along the seam
- Loose seam screws
- Missing fasteners
- Damaged rubber washers
- Bent or lifted panel edges
- Water trapped at an end lap
- Coating that has split directly over a joint
Interior Warning Signs
- Brown ceiling stains
- Damp insulation
- Water dripping during wind-driven rain
- Moldy odors in the attic
- Rust marks on the underside of panels
- Wet roof decking
- Water appearing near a wall or roof penetration
The location of an interior stain may not be directly below the leak. Water can follow framing, underlayment, or panel ribs before dripping into the attic.
What Should Be Used to Seal Metal Roof Seams?
There is no universal sealant for every metal roof. Product compatibility, flexibility, adhesion, temperature range, and panel finish all matter.
| Material | Best use | Main advantage | Important limitation |
|---|---|---|---|
| Butyl sealant tape | Between overlapping panels, flashing, and trim | Remains flexible and creates a compressed hidden seal | Must be installed inside the joint for best performance |
| Butyl tube sealant | Concealed joints and selected metal details | Flexible and compatible with many metal systems | Bead size and placement must follow manufacturer instructions |
| Urethane or polyurethane sealant | Certain exposed joints, flashing, fastener holes, and repair details | Strong adhesion and good weather resistance | Some products may not be compatible with every coating |
| Polyether sealant | Exterior metal-roof joints approved by the manufacturer | Flexible, paintable, and resistant to weathering | Surface preparation remains critical |
| Reinforced seam coating | Approved roof-restoration systems | Can bridge many aging seams as part of a complete system | Not a substitute for repairing loose panels, rust, or failed fasteners |
| Generic asphalt roof cement | Temporary emergency use only, if appropriate | Readily available | Can crack, trap moisture, look unsightly, and complicate future repairs |
For many panel joints, manufacturers specify non-curing butyl products because they remain flexible as the metal moves. MBCI notes that butyl is commonly used at panel joints, while urethane or other sealants may be required for particular details. It also stresses that the surfaces must be clean and dry and that the sealant bead must remain continuous. (MBCI)
Avoid using ordinary household silicone unless the roof manufacturer specifically approves it. Some silicone products do not adhere reliably to weathered roof coatings, cannot be painted, and may make later repairs more difficult.
Tools and Materials You May Need
The exact materials will depend on your roof, but a seam repair may require:
- Manufacturer-approved butyl tape
- Compatible metal-roof sealant
- Caulking gun
- Replacement roofing screws
- Oversized repair fasteners for stripped holes
- Soft brush or plastic scraper
- Mild detergent
- Clean cloths
- Rust-treatment product approved for the panel
- Matching metal primer and touch-up coating
- Hand seaming tools, when appropriate
- Cordless driver with adjustable torque
- Fall-protection equipment
Avoid steel-wire brushes and aggressive grinding unless the repair specification allows them. These tools can remove protective coatings and create new corrosion points.
How to Seal Metal Roof Seams Step by Step
The following process applies mainly to accessible lap seams and flashing joints. Mechanically locked standing seams may require specialized contractor equipment.
1. Locate the True Source of the Leak
Inspect the attic during or shortly after rain when it is safe to do so. Look for wet insulation, stained framing, rusty screw tips, or water trails.
Outside, examine the area above the interior stain. Continue checking uphill because water normally travels downward before entering the building.
Do not assume that the first cracked bead of caulk you see is the only problem.
2. Identify the Roof Manufacturer and Panel System
Review installation documents, warranties, invoices, or panel markings. The manufacturer may specify:
- The approved sealant chemistry
- Butyl-tape dimensions
- Fastener type
- Fastener spacing
- Seam-closing procedure
- Minimum repair temperature
- Warranty restrictions
Using an unapproved product may damage the panel finish or affect an existing warranty.
3. Decide Whether Roof Access Is Safe
Metal roofing can become extremely slippery from rain, dew, dust, pollen, or light frost. Steep slopes, high eaves, fragile skylights, and damaged panels increase the risk.
The OSHA residential fall-protection resources demonstrate how seriously roof falls are treated in professional construction. Homeowners without suitable access equipment, training, and anchor points should arrange a ground-based inspection or hire a roofer. (OSHA)
Never work on a wet, icy, or windy roof. Do not rely on a ladder alone as fall protection.
4. Clean and Dry the Joint
Sealant will not bond properly to:
- Dirt
- Chalky paint
- Oil
- Moisture
- Loose rust
- Old roofing cement
- Peeling coating
Remove loose material without damaging the metal. Wash the repair area with a mild cleaner approved for the panel finish, rinse it, and allow it to dry completely.
5. Remove Failed Sealant
Carefully remove loose or deteriorated sealant with a plastic scraper or another non-damaging tool.
Do not gouge the factory coating. Bare steel created during cleaning can rust quickly and may need approved primer and touch-up paint.
6. Repair Rust and Damaged Metal
Light surface corrosion may be cleaned and treated. However, a panel with deep pitting, perforation, thinning metal, or rust trapped inside a large lap may need partial or complete replacement.
Sealant cannot restore structural strength to corroded metal.
7. Open the Joint When the System Allows It
For many lap-seam repairs, remove the relevant screws and gently separate the overlapping metal.
Place a continuous strip of manufacturer-approved butyl tape in the correct location. Avoid stretching the tape because stretched tape can shrink and create gaps later.
At corners and intersections, join the material carefully so there are no breaks in the sealant line.
8. Reassemble and Compress the Seam
Return the metal to its correct position and install suitable fasteners according to the panel manufacturer’s pattern.
The goal is to compress the sealant evenly without crushing the panel or forcing all the sealant out of the joint.
Replace fasteners that are:
- Rusted
- Bent
- Too short
- Missing washers
- Spinning without tightening
- Installed at an incorrect angle
A stripped hole may require an approved oversized repair fastener rather than another screw of the same size.
9. Apply Exterior Sealant Only Where Needed
Some flashing joints, trim laps, fastener repairs, and panel details require an external bead of sealant.
Apply a smooth, continuous bead of the specified size. Tool it only if the product instructions permit. Do not smear sealant widely across the panel.
A thick surface patch may temporarily hide the seam while allowing moisture to remain beneath it. The ABC metal-building maintenance manual recommends disassembling leaking metal joints and reinstalling the proper sealant between the metal layers rather than relying on surface-applied caulk as a long-term repair.
10. Allow the Repair to Cure
Follow the sealant manufacturer’s temperature, humidity, and cure-time instructions.
Protect the repair from rain until the product has formed the required skin or completed its initial cure. Some products need considerably more time in cool or humid weather.
11. Test the Area Carefully
After curing, inspect the repair during natural rain or use a gently flowing garden hose when appropriate.
Begin at the lowest part of the test area and work upward gradually. This makes it easier to isolate the leaking detail.
Do not use a pressure washer. High-pressure water can be forced beneath otherwise functional overlaps and may damage the panel coating.
Expert Tip: Photograph the seam before disassembly and mark the original fastener locations. This helps preserve the panel alignment and gives you a clear record to show a contractor if the repair becomes more complicated.
Spot Repair or Full Seam-Coating System?

A spot repair is generally appropriate when:
- The leak is limited to one or two joints.
- The surrounding metal remains solid.
- Rust is minor and localized.
- Fasteners can still hold securely.
- The original overlap is correctly formed.
- The rest of the roof is performing well.
A reinforced seam-coating or full roof-restoration system may be considered when:
- Many seams show similar aging.
- Numerous fasteners and washers are failing.
- The roof coating is weathered across large areas.
- Small leaks are developing in several locations.
- The panels remain structurally sound.
- Replacement is not yet necessary.
A coating system requires more than rolling liquid over the roof. Proper work may include adhesion testing, rust treatment, fastener replacement, seam reinforcement, fabric or mesh installation, base coating, and a compatible finish coat.
Cost and Quality Considerations
The cost of sealing metal roof seams depends less on the price of one tube of sealant and more on the labor and access needed to make the joint reliable.
Important cost factors include:
- Roof height and slope
- Length and number of leaking seams
- Standing seam versus exposed-fastener construction
- Need for fall protection or lift equipment
- Amount of old sealant that must be removed
- Rust treatment or panel replacement
- Fastener replacement
- Flashing reconstruction
- Warranty-approved materials
- Whether the repair is isolated or roof-wide
A simple ground-level porch seam may be relatively inexpensive to address. A mechanically locked seam on a two-story house may require specialty tools, trained labor, and extensive safety setup.
When comparing contractor quotes, ask whether the roofer plans to rebuild the failed joint or merely cover it with sealant. A lower-priced surface patch may not offer the same durability.
When to Call a Roofing Professional
Call a qualified metal-roofing contractor when:
- The roof is steep, high, wet, or difficult to access.
- You do not have a proper fall-protection system.
- The leak is near electrical equipment.
- A standing seam has opened or become distorted.
- Several seams are leaking.
- Panels are rusted through.
- Roof decking or framing feels soft.
- A chimney, skylight, wall, valley, or curb is involved.
- Water continues entering after a previous repair.
- Large sections have been covered with roofing cement.
- The roof remains under a manufacturer or workmanship warranty.
- You are unsure where the water is entering.
Look for a contractor with direct experience repairing your type of metal panel. Ask for photos of similar repairs, insurance documentation, written material specifications, warranty terms, and a clear description of how the seam will be reconstructed.
Common Mistakes Homeowners Should Avoid
- Sealing the interior only: Caulking the underside may redirect water while leaving wet insulation and metal above it.
- Applying sealant over dirt or moisture: Even a premium product can fail when the surface is contaminated.
- Covering rust without treating it: Corrosion can continue beneath the repair.
- Using generic silicone: The product may not adhere to the panel finish or accept future coatings.
- Filling an entire standing seam with caulk: This may interfere with drainage, panel movement, or future reseaming.
- Overtightening screws: Excessive torque can split washers, dent the panel, and squeeze sealant out of the joint.
- Reusing damaged fasteners: Rusted or stripped screws may not create proper compression.
- Using roofing cement as a permanent repair: Thick asphalt patches can crack, trap water, and make later repairs harder.
- Ignoring nearby flashing: The apparent seam leak may begin at a vent, wall, ridge, or end lap.
- Working without fall protection: A small leak is not worth risking a serious fall.
FAQs
Can I seal a metal roof seam from the inside?
Interior sealant is rarely a dependable repair. Water has already entered the roof system by the time it reaches the underside. The leak should normally be corrected at the exterior joint so moisture does not remain trapped around insulation, decking, or framing.
What is the best sealant for metal roof seams?
The best product is the one approved for your specific panel system. Non-curing butyl tape is commonly used between overlapping metal surfaces. Urethane, polyether, or other metal-roof sealants may be specified for exposed joints and flashing details.
Can I use silicone on a metal roof?
Only use silicone when the roof or sealant manufacturer confirms compatibility. Ordinary household silicone may not bond well to weathered panel finishes, may be difficult to paint, and can interfere with future repairs.
Should I caulk every seam on a metal roof?
No. Some standing seams are designed to shed water through their shape and mechanical lock. Unnecessary surface caulk may restrict movement or hide a seam that needs mechanical repair. Follow the panel manufacturer’s details.
How long does metal roof seam sealant last?
Service life depends on the product, installation quality, sunlight, temperature movement, moisture exposure, and roof maintenance. Properly installed hidden butyl tape may last much longer than an exposed bead that receives constant ultraviolet exposure.
Can roof coating stop leaking metal seams?
A compatible reinforced coating system can help when many aging seams need restoration and the metal remains structurally sound. It should be installed only after loose panels, rust, failed fasteners, and flashing defects have been repaired.
Why is my newly sealed seam still leaking?
The water may be entering from another location, the surface may not have been clean and dry, the wrong product may have been used, or the joint may lack proper compression. Leaks can also travel from an uphill flashing or penetration before appearing near the repaired seam.
Conclusion
Knowing how to seal metal roof seams begins with identifying the roof system and locating the true source of the leak. Clean surfaces, compatible materials, correct overlap, proper fastener compression, and hidden sealant placement are more important than applying a large amount of caulk.
A small, accessible lap seam may be repairable with manufacturer-approved materials. Open standing seams, widespread corrosion, high roofs, recurring leaks, and flashing failures require professional attention.
Inspect the area carefully, review the manufacturer’s repair requirements, and choose a solution that restores the joint instead of simply covering it. When safety or the condition of the roof is uncertain, schedule an inspection with an experienced metal-roofing contractor before the next storm causes more damage.