
Where to Put Screws on a Metal Roof: Correct Placement Explained

Installing exposed-fastener metal roofing may look simple, but screw placement has a major effect on leaks, wind resistance, and roof life. A screw in the wrong part of the panel, driven at an angle, or tightened too much can damage the seal around the hole.
The correct answer to where to put screws on a metal roof depends on the panel profile, roof deck, framing, wind exposure, and manufacturer’s fastening schedule. This guide explains the general rules, common mistakes, and situations that require professional help.
Quick Answer
For many exposed-fastener metal roof panels, primary screws go through the flat or pan area and into solid decking, purlins, or framing below. Keep the rows straight and follow the panel manufacturer’s diagram. Do not assume every metal panel uses the same screw location or spacing.
Start With the Panel-Specific Fastening Diagram
There is no universal screw pattern for every metal roof.
Corrugated, 5V-crimp, R-panel, AG panel, and standing-seam roofs have different ribs, laps, drainage channels, and attachment methods. A screw position that is correct for one profile may weaken or leak on another.
The Metal Construction Association’s fastener compatibility guidance explains that profiled panels rely on properly selected fasteners for a strong, weather-resistant connection. Identify the panel manufacturer and model, then use its current installation manual. (Metal Construction Association)
Do not copy a generic screw pattern from a photo, video, or neighboring roof. The approved pattern must match the panel, substrate, and local wind requirements.
Should Screws Go in the Flat or on the Rib?
For many common exposed-fastener residential panels, primary panel screws are installed in the flat area, or pan, beside the major ribs. This lets the sealing washer sit flat and clamps the panel directly against the supporting surface.
For example, the Union Corrugating MasterRib installation manual shows panel screws in the flats, with a denser pattern at eaves, ridges, and end laps than at intermediate supports.
However, some systems call for fastening through a rib at specific locations. This is common with certain trims, caps, closures, side laps, and specially designed panel profiles. Therefore, “always use the flat” and “always use the rib” are both unreliable rules.
Why Flat-Area Fastening Is Common
A washered screw placed in an approved flat area can provide:
- Full washer contact with the panel
- A direct connection to decking or framing
- Less chance of crushing a raised rib
- Easier control of washer compression
- A fastening point consistent with many tested patterns
The manufacturer’s 5V metal roofing installation guide also shows defined flat-area screw locations and warns against fastening through the anti-siphon channel.
When a Screw May Go Through a Rib
The approved detail may require rib fastening for:
- Ridge or hip caps
- Rake, transition, or end-wall trim
- Panel side-lap stitching
- Closure attachment
- Profiles specifically designed for high-rib fastening
Never move a field screw onto a rib simply because the rib appears less exposed to water. The panel may not be designed or tested for that change.
Where Different Metal Roof Screws Usually Go
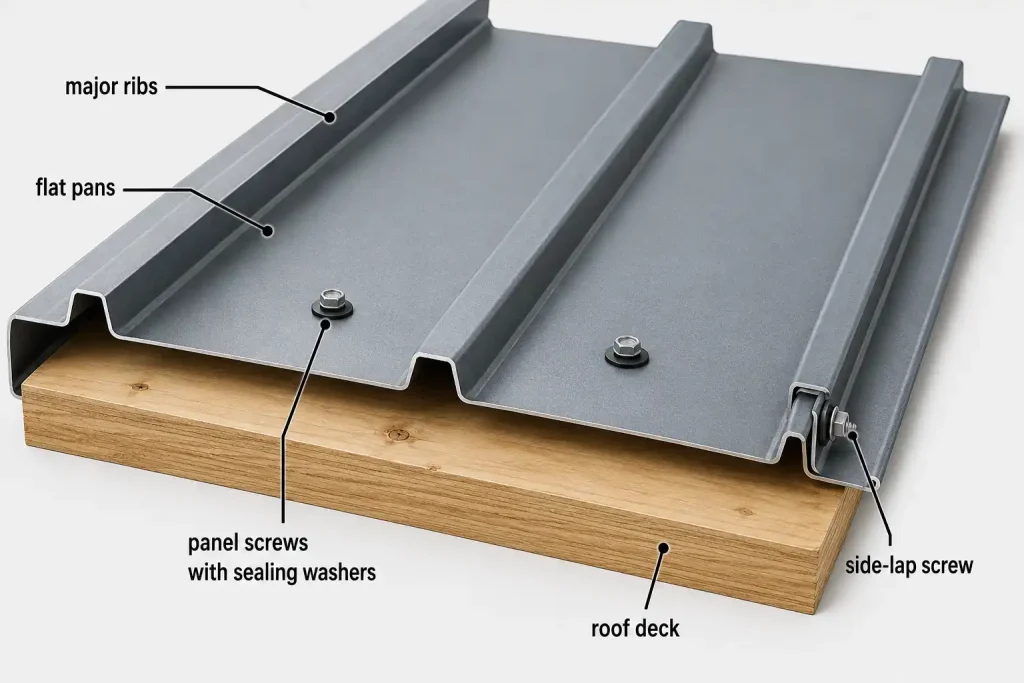
Metal roofs use several fastener types. Field screws, lap screws, and trim screws have different jobs and should not be interchanged.
| Roof area | Typical placement | Main risk if incorrect |
|---|---|---|
| Panel field | Approved flats or ribs directly over solid support | Loose panels, leaks, or wind uplift |
| Eave | Denser row shown in the fastening diagram | Wind damage at the lower edge |
| Ridge or hip | Through designated trim and closure locations | Wind-driven rain entry |
| Side lap | Stitch screws at specified intervals, when required | Gaps, rattling, or capillary leaks |
| End lap | Through the sealed overlap using the approved pattern | Leakage at the horizontal joint |
| Rake or wall flashing | At the trim spacing shown in the manual | Loose trim and edge leaks |
| Valley | Only where the valley detail permits penetration | Serious leakage in a high-water area |
Panel Field Screws
Field screws attach the broad area of the panel to the roof structure. Each screw must penetrate the intended substrate, such as solid wood decking, a wood purlin, or a steel framing member.
A screw driven only through thin sheet metal with empty space below is not a dependable structural connection. It may loosen, wobble, or pull out under wind pressure.
Eave and Perimeter Rows
Roof edges and corners often experience higher wind forces than the middle of the roof. Manufacturers commonly use closer or fuller patterns at eaves, ridges, end laps, and perimeter zones.
Do not continue a lighter intermediate pattern into an edge zone unless the approved drawing allows it.
Side-Lap and Trim Screws
Side-lap screws join neighboring panels. These shorter fasteners usually connect metal to metal rather than attaching the panel to framing. Install them only where shown, and keep them out of anti-siphon channels or drainage grooves.
Ridge caps, rake trim, wall flashing, and transitions often use separate fasteners and spacing. Some trim screws pass through ribs because caps and closures are secured at the panel’s high points. This does not mean field screws should also be moved to the ribs.
How Far Apart Should Metal Roof Screws Be?
Screw spacing depends on several factors:
- Panel profile and metal gauge
- Roof deck or purlin spacing
- Roof slope
- Building height and shape
- Local design wind speed
- Edge, corner, and field roof zones
- Tested fastening pattern
- Applicable building code
Many installations use horizontal fastener rows aligned with decking or purlins. Intermediate rows may contain fewer screws than rows at the eave, ridge, or end laps.
Do not treat common spacing numbers such as 12, 18, or 24 inches as automatic rules. Use the spacing shown in the manufacturer’s detail or the project’s engineered fastening schedule.
Adding unnecessary screws creates extra roof penetrations. Using too few screws can reduce wind resistance. The goal is not the greatest number of screws; it is the correct number in the correct locations.
How Tight Should Metal Roof Screws Be?
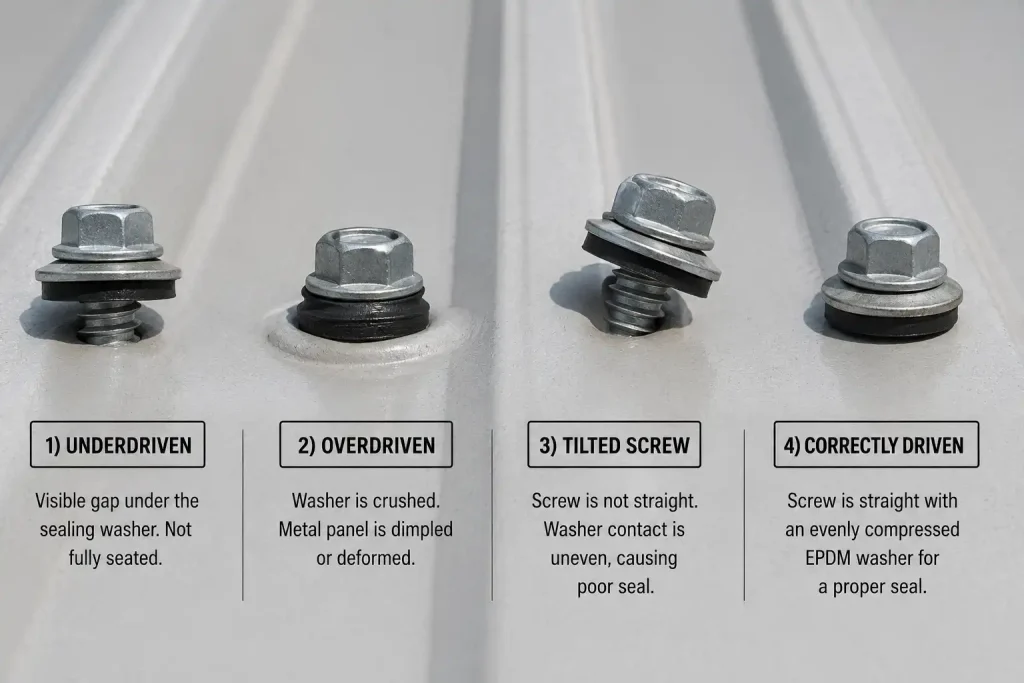
A metal roofing screw should sit straight and snug. Its sealing gasket should be compressed enough to close the hole without being crushed or forced far beyond the metal washer.
Underdriven Screw
Common signs include:
- A gap under part of the washer
- A gasket that can move or spin
- A screw head that sits noticeably high
- Panel movement around the fastener
Overdriven Screw
Common signs include:
- Rubber bulging from beneath the washer
- A split or deformed gasket
- A dimple around the screw
- Stripped wood or metal threads
- A tilted fastener
Correctly Driven Screw
The screw is perpendicular to the panel, the washer contacts the metal evenly, and the gasket is visibly compressed without being flattened excessively.
The Metal Construction Association notes that proper fastening tools affect both watertightness and connection integrity. An adjustable screw gun or driver with controlled torque is safer than running an impact driver at full power. (Metal Construction Association)
Expert Tip: Test several screws on a scrap panel over the same substrate. Adjust the tool until the washer seals evenly without denting the metal.
A Simple Method for Laying Out Screw Rows
- Identify the panel. Confirm the manufacturer, profile, gauge, width, and installation type.
- Obtain the correct manual. Make sure it covers installation over your deck, wood purlins, or steel framing.
- Locate solid support. Mark purlins, rafters, or approved screw lines before placing panels.
- Mark perimeter patterns. Eaves, ridges, corners, and end laps may require more fasteners.
- Snap straight guide lines. This improves appearance and helps prevent missed framing.
- Square panels to the eave. An out-of-square first panel can misalign every lap and screw row.
- Drive screws straight. Stop when the washer is evenly seated.
- Remove metal shavings. Drill swarf can rust and stain the roof finish.
- Inspect each row. Correct tilted, stripped, missed, loose, or overdriven screws immediately.
Common Mistakes Homeowners Should Avoid
- Using the same pattern for every panel. Metal profiles are not interchangeable.
- Missing the deck or purlin. A screw without solid material below cannot provide proper holding strength.
- Overdriving the washer. Crushed gaskets and panel dimples often become leak points.
- Leaving screws loose. An uncompressed washer cannot seal reliably.
- Driving screws at an angle. The gasket seals unevenly and may split.
- Fastening through a drainage channel. This can defeat the panel’s water-control design.
- Using the wrong screw. Incorrect threads, length, washer, coating, or metal can cause pullout or corrosion.
- Adding random screws around a leak. This creates more holes without fixing the real source.
- Ignoring edge-zone requirements. Perimeters and corners may need stronger fastening.
- Leaving metal shavings behind. Swarf can rust and damage the panel coating.
Warning Signs of Poor Screw Placement
Schedule an inspection when you see crooked rows, missing screws, rust streaks, cracked washers, dents around screw heads, loose trim, panels lifting in wind, or water stains below fastener rows.
Repeatedly loose screws may indicate more than normal wear. Possible causes include missed framing, rotten decking, oversized holes, panel movement, wrong fasteners, or an incorrect original pattern.
A few damaged screws may be replaceable. A roof with hundreds of misplaced or overtightened screws may require systematic refastening, approved oversized repair screws, panel replacement, or structural repairs.
When to Call a Roofing Professional
Call a qualified metal roofing contractor when:
- The roof is steep, high, wet, or difficult to access
- The panel manufacturer or fastening schedule is unknown
- The property is in a coastal or high-wind area
- Screws repeatedly loosen or back out
- Existing holes are enlarged, rusted, or leaking
- Panels are fastened into damaged or rotten decking
- Valleys, chimneys, skylights, or wall flashings are involved
- A large roof section appears incorrectly fastened
- The roof is still under warranty
- You plan to change the screw size, type, pattern, or location
Roof work also involves severe fall risk. OSHA’s construction fall-protection requirements address roofing and residential construction work performed six feet or more above lower levels. Treat roof access as a major safety decision, not routine home maintenance. (OSHA)
Professional diagnosis is especially important when a roof leaks even though nearby screws look tight. The actual source may be a panel lap, flashing joint, failed sealant, underlayment problem, or condensation.
FAQs
Do metal roof screws go on top of the rib or in the flat?
Many exposed-fastener panels place primary screws in the flat or pan. Other profiles and trim details use rib fastening. Follow the exact diagram for your panel.
Should metal roof screws line up in straight rows?
Yes. Straight rows improve appearance and help installers hit consistent support lines. Wandering rows may indicate poor layout or missed purlins.
Can I add extra screws to stop a leak?
Extra screws do not reliably stop leaks and may create more holes. Identify whether the water is entering through a washer, lap, flashing, sealant joint, or panel defect.
Can metal roofing screws be overtightened?
Yes. Overtightening can crush the gasket, strip the substrate, tilt the fastener, and dimple the panel. The washer should be compressed evenly, not flattened.
What should I do if a screw misses the wood?
Remove it rather than leaving it loose. Repair the unused hole using the panel manufacturer’s approved method, then install the correct fastener into solid support.
Are standing-seam roof screws placed the same way?
No. Most standing-seam roofs use concealed clips or a hidden fastening flange. Face-fastening the visible panel field may restrict movement and void the system’s intended design.
How often should exposed screws be inspected?
Check the roof after severe storms and during routine roof maintenance. The appropriate schedule depends on roof age, fastener condition, climate, and warranty requirements.
Conclusion
Knowing where to put screws on a metal roof begins with identifying the panel rather than guessing between the rib and the flat. For many exposed-fastener systems, primary screws go in specified flat areas over solid support, while laps, trims, ridges, and perimeter zones use separate patterns.
Use the manufacturer’s current manual, keep screw rows straight, seat every washer correctly, and avoid adding random fasteners. For steep, complex, leaking, or high-wind roofs, arrange a professional inspection before making new penetrations. Correct screw placement protects the roof’s strength, weather resistance, appearance, and long-term value.