
How to Install Metal Roof Valley: A Step-by-Step Guide for Homeowners

Installing a metal roof valley is one of the most important parts of a metal roofing system. If the valley is installed incorrectly, water can leak into your home, damage the roof deck, and lead to expensive repairs. Many homeowners researching how to install metal roof valley want to understand the process before deciding whether to tackle the project themselves or hire a contractor.
This guide explains how metal roof valleys work, the tools and materials you’ll need, installation steps, common mistakes, safety considerations, and when it’s best to call a roofing professional. Whether you’re planning a new metal roof or replacing an older one, understanding valley installation helps you make informed decisions and protect your investment.
Quick Answer
To install a metal roof valley, first install the underlayment and ice-and-water protection, position and fasten the metal valley flashing, then install roofing panels while maintaining the recommended clearance from the valley center. Seal and fasten components according to the manufacturer’s instructions to ensure proper drainage and prevent leaks.
What Is a Metal Roof Valley?
A roof valley is where two roof slopes meet, creating a channel that directs rainwater and melting snow toward the gutters.
Because valleys carry more water than almost any other part of a roof, they require careful installation. Even a small mistake can result in leaks over time.
Metal roof valleys typically include:
- Valley flashing
- Waterproof underlayment
- Ice and water shield (where required)
- Metal roofing panels
- Closure strips (when specified)
- Fasteners and sealant
Proper installation also depends on following the roofing manufacturer’s installation guide. Organizations like the Metal Construction Association provide helpful educational resources about metal roofing systems.
Why Proper Valley Installation Matters
A properly installed valley helps:
- Prevent water intrusion
- Extend roof life
- Protect roof decking
- Reduce maintenance
- Improve overall drainage
- Maintain manufacturer warranty eligibility
Poor valley installation is one of the most common causes of metal roof leaks.
Tools and Materials You’ll Need
Before starting, gather the proper materials.
| Tool or Material | Purpose |
|---|---|
| Valley flashing | Directs water safely off the roof |
| Ice and water shield | Extra waterproof protection |
| Synthetic underlayment | Secondary moisture barrier |
| Metal roofing panels | Main roofing material |
| Roofing screws | Secure panels and flashing |
| Butyl sealant tape | Waterproof sealing |
| Tin snips | Cutting metal |
| Tape measure | Accurate layout |
| Chalk line | Straight panel alignment |
| Drill/driver | Fastening screws |
| Safety harness | Fall protection |
Roof work involves serious fall hazards. The OSHA residential roofing safety guidance recommends proper fall protection whenever working on elevated roofs.
Understanding Open vs. Closed Metal Valleys
Open Valley
An open valley leaves the metal flashing visible.
Advantages
- Excellent water flow
- Easier maintenance
- Better debris removal
- Common on standing seam roofs
Closed Valley
Panels meet more closely over the valley.
Advantages
- Cleaner appearance
- Less exposed flashing
Limitations
- Can trap debris
- Requires more precise installation
Most residential metal roofing systems use an open valley because it provides better long-term drainage.
Step-by-Step: How to Install Metal Roof Valley
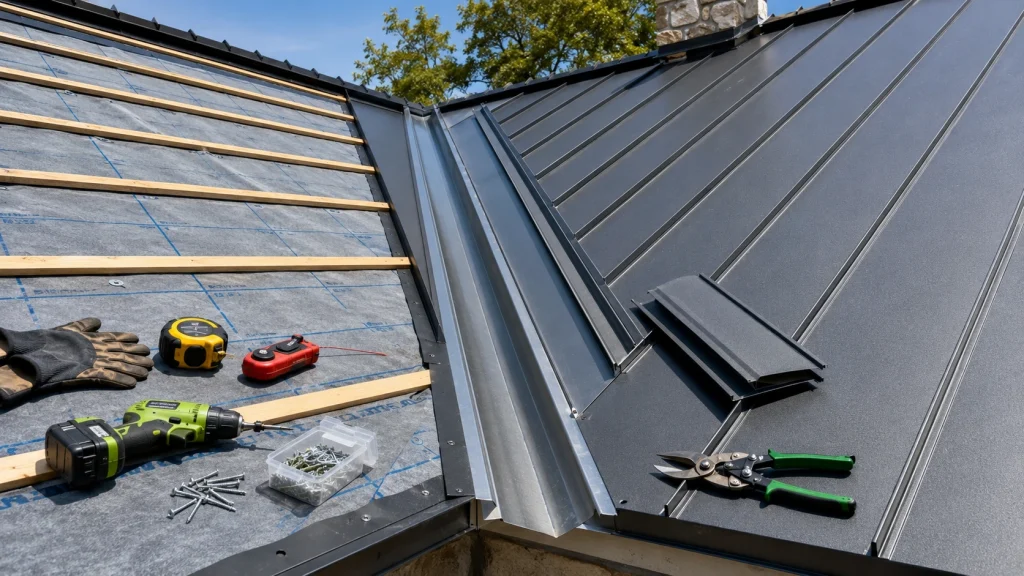
Step 1: Inspect the Roof Structure
Before installation:
- Check roof decking for rot
- Replace damaged plywood
- Ensure framing is solid
- Confirm valley alignment
Installing new flashing over damaged decking is never recommended.
Step 2: Install the Underlayment
Roll synthetic underlayment across both roof slopes.
Overlap seams according to manufacturer recommendations.
The underlayment provides an additional moisture barrier if wind-driven rain gets beneath the metal panels.
Step 3: Apply Ice and Water Shield
Install self-adhering waterproof membrane directly in the valley.
This extra protection is especially important in cold climates where ice dams may develop.
According to the International Code Council, many building codes require ice barrier protection in regions prone to freezing conditions.
Step 4: Position the Valley Flashing
Center the valley flashing over the valley line.
Ensure:
- Equal coverage on both sides
- Straight alignment
- Smooth installation
- No buckling
Most valley flashing extends several inches onto each roof plane.
Never force flashing to bend sharply.
Step 5: Fasten the Valley Flashing
Secure flashing with roofing screws placed near the outer edges.
Do not place fasteners in the center water channel.
Doing so creates unnecessary leak points.
Fastener spacing depends on the roofing manufacturer.
Step 6: Install Metal Roof Panels
Lay roofing panels from the eaves upward.
As each panel approaches the valley:
- Measure carefully
- Cut cleanly
- Leave the recommended expansion gap
- Avoid sharp jagged cuts
Maintain a consistent reveal along the valley for both appearance and drainage.
Step 7: Seal Where Required
Some roofing systems require:
- Butyl tape
- Closure strips
- Approved sealants
Use only sealants recommended by your roofing manufacturer.
Too much sealant can trap moisture rather than prevent leaks.
Step 8: Inspect the Finished Valley
After installation, verify:
- Straight valley line
- Proper screw placement
- Clean cuts
- Secure flashing
- Correct panel spacing
- No exposed underlayment
A careful final inspection helps catch small issues before they become expensive repairs.
Helpful Table: DIY vs. Professional Valley Installation
| Factor | DIY Installation | Professional Installation |
|---|---|---|
| Initial Cost | Lower | Higher |
| Safety Risk | High | Lower for homeowner |
| Installation Speed | Slower | Faster |
| Leak Risk | Higher if inexperienced | Lower with experienced installer |
| Warranty Protection | May be limited | Often preserved |
| Specialized Tools | Must purchase or rent | Included |
Expert Tip
Expert Tip: Before cutting expensive metal panels, create a cardboard template for the valley angle. This simple step reduces waste, improves fit, and helps achieve a cleaner finished appearance.
Signs Your Existing Roof Valley Needs Attention
Watch for:
- Water stains in the attic
- Rusted valley flashing
- Loose fasteners
- Sealant deterioration
- Visible gaps
- Corrosion
- Standing water
- Repeated roof leaks after heavy rain
Addressing these warning signs early can prevent structural damage.
Safety Considerations
Metal roofing work can be dangerous.
Always:
- Wear non-slip footwear.
- Use fall protection.
- Avoid working on wet roofs.
- Never work during high winds.
- Wear gloves to prevent cuts from sharp metal edges.
- Use eye protection when cutting metal.
If you’re uncomfortable working at heights, hiring a qualified roofing contractor is the safest option.
When to Call a Roofing Professional
Although experienced DIY homeowners can install simple roofing projects, metal roof valleys demand precision.
Consider hiring a professional if:
- Your roof has a steep slope.
- Multiple valleys intersect.
- The roof has skylights or chimneys near the valley.
- Structural repairs are needed.
- You’re replacing an older roof.
- You’re unsure about flashing installation.
- Warranty coverage is important.
Professional installers also understand local building codes, manufacturer requirements, and proper waterproofing techniques.
Maintenance Tips After Installation
Proper maintenance extends the life of your roof valley.
Inspect annually for:
- Leaves and debris
- Loose screws
- Rust spots
- Damaged sealant
- Bent flashing
After major storms, check the valley for branches or debris that may restrict water flow.
Keeping the valley clean helps prevent standing water and premature corrosion.
Common Mistakes Homeowners Should Avoid

- Driving screws through the center of the valley.
- Skipping ice and water shield.
- Cutting panels too short or too long.
- Using incompatible sealants.
- Walking directly in the valley during installation.
- Ignoring manufacturer installation instructions.
- Installing over damaged roof decking.
- Forgetting to inspect flashing alignment before fastening.
Even small installation errors can shorten the lifespan of a metal roof.
FAQs
How much space should metal roofing panels leave from the valley center?
Most manufacturers recommend leaving a small clearance on each side of the valley center to allow proper drainage. Always follow your specific roofing manufacturer’s installation instructions.
Can I install a metal roof valley without valley flashing?
No. Valley flashing is a critical waterproof component that channels water safely off the roof and helps prevent leaks.
Should screws be installed in the center of the valley?
No. Fasteners should never be placed in the main water channel, as they create potential leak points.
What type of underlayment is best under a metal roof valley?
Synthetic underlayment combined with an ice-and-water shield in the valley provides excellent protection for most residential metal roofs.
How long does a properly installed metal roof valley last?
When installed correctly and maintained regularly, a metal roof valley can last as long as the roofing system itself—often 40 to 70 years, depending on the material and environmental conditions.
Can heavy rain damage a poorly installed valley?
Yes. Valleys handle large volumes of water, so improper flashing, incorrect fastener placement, or inadequate sealing can quickly lead to leaks during heavy rainfall.
Conclusion
Learning how to install metal roof valley helps homeowners understand one of the most important parts of a durable metal roofing system. Proper underlayment, correctly installed valley flashing, careful panel cutting, and accurate fastener placement all work together to keep water flowing safely off the roof. While skilled DIYers may complete straightforward installations, complex roofs and steep slopes are often best left to experienced professionals. By following manufacturer recommendations, prioritizing safety, and addressing problems early, you can protect your home and maximize the lifespan of your metal roof. If you’re unsure about your roof’s condition or installation requirements, schedule a professional inspection before beginning your project.