
How to Protect Your Roof From Storm Damage

A strong storm can turn a small roofing weakness into an expensive leak. High winds can lift shingles and metal panels, hail can crack or dent roofing materials, falling branches can puncture the surface, and wind-driven rain can enter through damaged flashing or seams.
Learning how to protect your roof from storm damage is mostly about finding weak areas before bad weather arrives, keeping water drainage clear, and knowing when professional help is safer than a DIY repair. This guide explains practical steps for asphalt shingles, metal roofs, tile, flat roofs, and other common systems, plus what to check before and after a storm.
Quick Answer
To protect your roof from storm damage, inspect it regularly, repair loose or damaged roofing materials, keep gutters clear, trim dangerous tree limbs, secure flashing and roof edges, and address leaks promptly. Before severe weather, document your roof’s condition. Afterward, inspect from the ground and have questionable damage evaluated by a qualified roofing contractor.
Why Storms Cause So Much Roof Damage
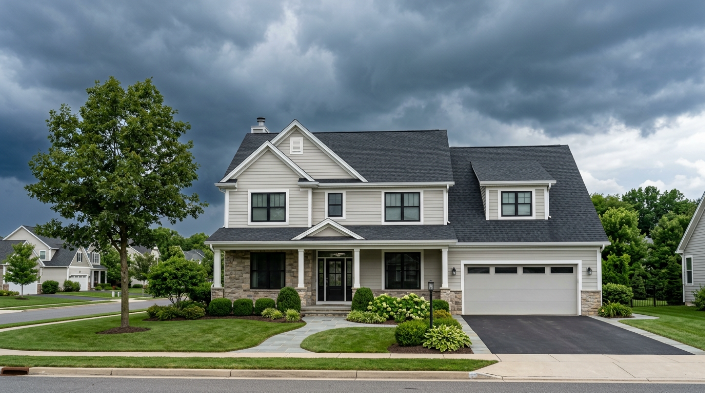
Your roof is a system rather than a single layer. The visible shingles, panels, tiles, or membrane are only part of it.
Underneath may be underlayment, decking, fasteners, flashing, ventilation components, and structural framing. A weakness in any one of these areas can allow wind or water to cause additional damage.
The most common storm threats include:
- High winds: Can lift shingles, loosen metal panels, damage flashing, and pull materials away from roof edges.
- Hail: Can bruise asphalt shingles, dent metal, crack tile, and damage vents or flashing.
- Wind-driven rain: Can force water underneath materials that normally shed ordinary rainfall.
- Falling debris: Branches and other objects can puncture roof coverings or damage gutters.
- Heavy rainfall: Can overwhelm clogged gutters and drains, allowing water to back up.
- Tornadoes and hurricanes: Combine extreme wind, debris, pressure changes, and prolonged rain.
The Insurance Institute for Business & Home Safety notes that wind and water can exploit weak areas of a home and recommends addressing the roof early when preparing for severe weather. Its homeowner storm-preparation guidance emphasizes professional inspection, timely repairs, and stronger roof assemblies where appropriate.
Inspect Your Roof Before Storm Season
Preventive inspection is one of the most useful things a homeowner can do.
The goal is not to climb onto the roof and search every square foot yourself. Instead, look for obvious problems from the ground, through an upstairs window, or from another safe location. A roofing professional can perform a closer inspection when necessary.
Check the Roofing Material
Different materials show weakness in different ways.
Asphalt shingles: Look for missing, cracked, curled, lifted, or badly worn shingles. Large amounts of granules collecting in gutters can also indicate aging.
Metal roofing: Watch for lifted panel edges, loose fasteners, separated seams, damaged flashing, corrosion, or deteriorated sealant. These defects can become entry points for a metal roof leak when wind-driven rain arrives.
Tile roofing: Look for cracked, displaced, or missing tiles. Broken tiles can expose the weather-resistant layers underneath.
Flat or low-slope roofing: Check for ponding water, damaged seams, punctures, loose flashing, or bubbling in EPDM, TPO, or similar membranes.
Wood shakes or shingles: Look for splitting, curling, decay, missing pieces, and excessive biological growth.
The National Roofing Contractors Association recommends preventative roof maintenance and additional inspections after severe weather. Its residential roof maintenance guidance also emphasizes addressing deterioration before it develops into a larger problem.
Inspect Flashing and Roof Penetrations
Flashing is the metal or waterproof material installed where different parts of the roof meet. It is commonly found around:
- Chimneys
- Skylights
- Plumbing vents
- Roof valleys
- Dormers
- Walls that meet the roof
- Metal roof seams and transitions
Loose, cracked, corroded, or poorly sealed flashing can leak even when the surrounding roof material looks fine.
Do not simply cover questionable flashing with large amounts of roofing cement or caulk. Temporary sealants can hide a more serious defect and may interfere with a manufacturer’s approved repair method.
Keep Gutters and Drainage Paths Clear
Roof drainage becomes especially important during intense rainfall.
Leaves, twigs, granules, and other debris can block gutters and downspouts. Water may then spill over the gutter, collect near roof edges, or drain next to the foundation.
Before storm season:
- Remove debris from accessible gutters safely.
- Confirm downspouts are firmly attached.
- Check that downspouts discharge away from the foundation.
- Repair sagging or loose gutter sections.
- Have roof drains inspected on flat or low-slope roofs.
- Make sure valleys are not visibly obstructed.
A roof that drains correctly has a much better chance of handling prolonged rainfall without unnecessary water buildup.
Trim Trees and Secure Outdoor Objects
A healthy roof can still be damaged by something striking it.
Remove dead, diseased, or unstable branches that could fall onto the house. Tree work near electrical lines should be handled by the appropriate utility or qualified professionals rather than homeowners.
Also secure or move items that could become airborne during high winds, such as:
- Patio furniture
- Trash cans
- Grills
- Yard decorations
- Lightweight storage containers
- Sports equipment
FEMA’s severe-wind property protection guidance recommends strengthening vulnerable roofing components, dealing with dangerous trees or limbs, and securing outdoor objects before high-wind events.
Strengthen the Roof’s Most Vulnerable Areas
Some improvements are most practical when repairs or replacement are already planned.
| Roof area | Storm vulnerability | Protective measure |
|---|---|---|
| Roof covering | Wind lifting, hail impact | Proper installation and storm-rated materials |
| Roof edges | Wind can get underneath materials | Secure drip edge, starter materials, and edge flashing |
| Decking | Water intrusion after covering loss | Consider a sealed or upgraded roof deck during replacement |
| Flashing | Wind-driven rain penetration | Repair loose, corroded, or poorly integrated flashing |
| Roof-to-wall connection | Extreme wind uplift | Evaluate structural connectors where appropriate |
| Gutters and drains | Overflow during heavy rain | Keep drainage clear and securely fastened |
| Penetrations | Water entering around vents or skylights | Maintain boots, flashing, and manufacturer-approved seals |
FEMA guidance on improving windstorm resilience notes that correct installation, suitable wind-resistant roofing products, and measures such as a sealed roof deck can improve roof performance when the main roof covering is damaged.
Consider Impact- and Wind-Resistant Materials
If your roof is already near the end of its useful life, replacement gives you an opportunity to improve storm resistance.
Ask your contractor about products rated for the wind and hail conditions common in your area. More expensive materials are not automatically more storm-resistant; installation quality matters just as much as the product itself.
Approximate service life also affects the decision:
- Asphalt shingles: commonly around 20–30 years
- Metal roofing: often 40–70 years
- Wood shakes: commonly 25–40 years
- EPDM or TPO systems: often around 20–30 years
- Quality tile roofing: frequently 50 years or longer
Actual life depends heavily on climate, maintenance, installation, ventilation, material quality, and storm exposure.
Pay Special Attention to Metal Roof Leaks
Metal roofs generally handle severe weather well when correctly installed, but storms can reveal weaknesses.
A metal leak may develop around:
- Panel seams
- Exposed fasteners
- Ridge caps
- Valleys
- Chimneys
- Skylights
- Pipe penetrations
- Transition flashing
Metal also expands and contracts with temperature changes. Over time, movement can affect fasteners, seams, and sealants.
After a major windstorm, look from the ground for panels that appear raised, shifted, wrinkled, or missing. Inside the attic, check for fresh moisture around penetrations and seams.
Avoid walking on a metal roof to locate the leak yourself. Wet metal can be extremely slippery, and stepping in the wrong place can damage some panel systems.
Check Attic Ventilation and Moisture
Not every moisture mark after a storm proves the roof covering is leaking.
Poor attic ventilation can cause condensation, especially when warm indoor air reaches cold roof decking. Moisture may darken wood, dampen insulation, or resemble a roof leak.
Look for:
- Wet insulation
- Darkened decking
- Musty odors
- Rust around nails or fasteners
- Mold-like growth
- Water trails
- Daylight through unexpected openings
Active dripping during or immediately after wind-driven rain is more suggestive of exterior water intrusion.
A contractor may need to distinguish between a roofing leak, flashing problem, condensation issue, plumbing leak, or ventilation defect.
What to Do When a Severe Storm Is Forecast
You may have only a short preparation window, so concentrate on safe tasks.
1. Make a Ground-Level Check
Look for obvious loose shingles, gutter problems, damaged tree limbs, and debris.
Do not attempt last-minute roof repairs while winds are increasing or surfaces are wet.
2. Secure Outdoor Objects
Store or secure anything that could become airborne and strike the roof, siding, windows, or neighboring property.
3. Document the Roof’s Condition
Take dated photographs from safe locations.
Pre-storm photos can be valuable if you later need to document newly developed damage for a contractor or insurance claim.
4. Locate Important Records
Keep these together:
- Roofing contract
- Manufacturer warranty
- Workmanship warranty
- Previous inspection reports
- Homeowners insurance information
- Contractor contact information
- Previous roof photographs
5. Stay Off the Roof
Once severe weather is approaching, roof access should stop.
No missing shingle or questionable seam is worth risking a fall.
What to Check After a Storm
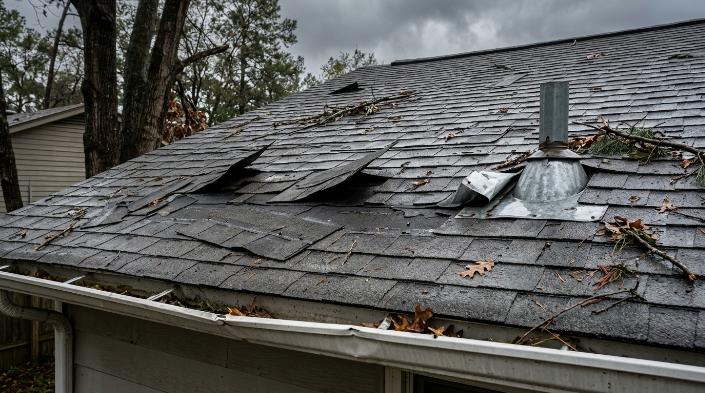
Wait until conditions are safe. Then begin with a ground-level inspection.
The National Roofing Contractors Association advises property owners to assess storm damage from the ground and leave close inspection and repairs to roofing professionals. Its guidance for roof repairs after storms specifically warns against homeowners attempting storm repairs themselves.
Look for these warning signs:
| Warning sign | What it may indicate |
|---|---|
| Missing or lifted shingles | Wind damage and exposed underlayment |
| Bent or raised metal panels | Fastener, seam, or wind-uplift damage |
| Cracked tiles | Hail or impact damage |
| Loose flashing | Increased leak risk |
| Heavy granule deposits | Asphalt shingle wear or hail damage |
| Dented vents or gutters | Possible hail impact elsewhere on roof |
| Water stains indoors | Active or recent water intrusion |
| Wet attic insulation | Leak, condensation, or ventilation problem |
| Sagging roof area | Possible decking or structural damage |
| Branches on the roof | Potential punctures or hidden damage |
Take photographs without entering unsafe areas.
If water is actively entering the home, place containers beneath drips where practical and move valuables out of the affected area. Contact a roofing professional about safe temporary weatherproofing.
Expert Tip
Expert Tip: Keep a simple “roof file” with dated photos, inspection reports, warranty documents, repair invoices, and your contractor’s information. If a storm damages the roof, you will have a much clearer record of its pre-storm condition and previous maintenance.
Understand Cost, Warranty, and Insurance Considerations
Storm-protection costs vary significantly.
A small flashing repair is very different from replacing an aging roof, installing a sealed roof deck, rebuilding damaged decking, or upgrading structural roof-to-wall connections.
Important cost factors include:
- Roof size
- Roof pitch
- Number of stories
- Material type
- Labor rates
- Accessibility
- Amount of damaged decking
- Flashing complexity
- Local building-code requirements
- Disposal costs
- Emergency service needs
Before approving repairs, ask whether the work could affect an existing manufacturer or workmanship warranty. Certain products require specific fasteners, sealants, installation details, or approved repair procedures.
For insured storm damage, photograph visible damage and contact your insurer promptly. Avoid signing over insurance benefits or approving major permanent work before you understand your policy, deductible, scope of damage, and contractor proposal.
DIY Tasks Versus Professional Roofing Work
Homeowners can perform several useful storm-preparation tasks without climbing onto the roof.
Reasonable DIY jobs may include:
- Photographing the roof from the ground
- Moving patio furniture
- Checking ceilings for stains
- Inspecting accessible attic areas
- Cleaning ground-level drainage components
- Organizing warranty and insurance documents
Tasks involving roof access, structural damage, steep slopes, wet surfaces, electrical hazards, or major repairs should normally be left to trained professionals.
OSHA’s roof inspection and repair safety guidance highlights hazards associated with roof work and improper ladder use, including unstable ladder placement and fall risks.
When to Consult a Licensed Roofing Contractor
Contact a qualified roofing contractor—licensed where required by your state or locality—when you notice:
- Missing or significantly lifted roofing materials
- A recurring or active roof leak
- Loose or displaced metal panels
- Damaged flashing
- Cracked or missing tiles
- Large hail impacts
- Fallen trees or heavy branches on the roof
- Sagging roof areas
- Soft or deteriorated decking
- Significant storm debris
- Multiple interior water stains
- Damage connected to an insurance claim
You should also request a professional assessment if an older roof has survived a major storm but appears undamaged. Some problems are difficult to identify from the ground.
Structural movement, widespread sagging, broken framing, or major tree impact may require both a roofing contractor and a qualified structural professional.
Common Mistakes Homeowners Should Avoid
- Climbing onto a wet or storm-damaged roof. The surface may be slippery, unstable, or structurally compromised.
- Waiting for a small leak to become serious. Minor water intrusion can damage insulation, ceilings, decking, and framing.
- Covering everything with roofing cement. Improper patches may fail quickly or complicate permanent repairs.
- Ignoring gutters and drainage. Heavy rain can expose drainage problems that are harmless during light showers.
- Assuming a metal roof cannot leak. Panels may be durable, but seams, penetrations, flashing, and fasteners still require attention.
- Choosing a contractor based only on the lowest price. Compare the proposed scope, materials, warranty, insurance, credentials, and repair method.
- Replacing roofing without correcting underlying problems. Damaged decking, poor ventilation, or weak flashing details should be addressed at the same time.
- Discarding documentation. Inspection reports, photos, warranties, and invoices can help during future repairs or insurance claims.
FAQs
How often should I have my roof inspected for storm damage?
A general inspection in spring and fall is useful, with an additional check after major hail, wind, hurricane, tornado, or severe thunderstorm events. Older roofs and roofs with previous leaks may need closer monitoring.
Can I tell if hail damaged my roof from the ground?
Sometimes. You may see dented gutters, damaged vents, broken tiles, or debris, but many hail impacts are difficult to evaluate from the ground. A professional inspection may be necessary when hail was significant.
Can wind damage a roof without removing shingles?
Yes. Shingles can loosen or lose their seal without disappearing completely. Metal seams and flashing can also move slightly. Hidden damage may allow water to enter during a later storm.
What should I do if my metal roof starts leaking after a storm?
Check the interior for where water is appearing, photograph visible damage from safe locations, protect belongings, and call a roofing professional. A metal roof leak may originate at a seam, penetration, fastener, flashing detail, or damaged panel rather than directly above the interior stain.
Should I replace my roof before hurricane season?
Not automatically. If the roof still has substantial useful life and is in good condition, targeted maintenance may be enough. A roof that is badly deteriorated, repeatedly leaking, or near the end of its expected service life deserves professional evaluation before severe weather season.
Does homeowners insurance cover storm roof damage?
Coverage depends on the policy and cause of loss. Wind and hail may be covered under many policies, but deductibles, exclusions, depreciation, roof age, maintenance issues, and settlement methods vary. Review your policy and contact your insurer after suspected covered damage.
Is it safe to tarp a damaged roof myself?
Usually not if installing the tarp requires walking on the roof. Storm-damaged surfaces may be slippery or unstable. Professional temporary weatherproofing is safer when roof access is required.
Conclusion
Knowing how to protect your roof from storm damage starts long before the weather turns dangerous. Keep roofing materials, flashing, gutters, drainage, and nearby trees in good condition. Pay attention to early warning signs such as loose shingles, a metal roof leak, deteriorated flashing, aging materials, poor attic ventilation, and recurring moisture.
When a storm is approaching, secure outdoor objects, document the roof’s condition, and stay off the roof. After the storm, inspect from safe locations and photograph anything unusual.
Most importantly, do not turn an expensive roofing problem into a personal safety emergency. When damage is significant, hidden, structural, or connected to an insurance claim, have the roof evaluated by a qualified roofing contractor and make repairs before the next storm finds the same weak point.
SEO METADATA (do not paste into the article):
Meta Title: How to Protect Your Roof From Storm Damage
Meta Description: Learn how to protect your roof from storm damage with practical tips for wind, hail, leaks, inspections, repairs, and safer preparation.
URL Slug: protect-roof-from-storm-damage
Focus Keyword: How to Protect Your Roof From Storm Damage
Secondary Keywords: roof storm damage prevention, storm roof protection, roof inspection after storm, metal roof leak, wind damage to roof, hail damage to roof
Image Placeholders:
[IMAGE PLACEHOLDER 1]
Placement: After the introduction, before the “Quick Answer” section
Purpose: Visually introduce the main homeowner concern and show a properly maintained residential roof prepared for severe weather.
Caption: A well-maintained roof provides the first line of defense against wind, hail, and heavy rain.
Alt Text: How to protect your roof from storm damage before severe weather
Image Prompt: Realistic editorial photograph of a modern American suburban home with a well-maintained asphalt shingle roof as dark storm clouds approach, gutters clean and securely attached, nearby tree branches safely trimmed away from the roof, natural daylight, professional home-improvement photography, realistic materials and proportions, no people on the roof, no text or logos.
Recommended Size: 1200×675 px
Suggested File Name: how-to-protect-roof-from-storm-damage.jpg
Suggested Surrounding Text: Preparing the roof before severe weather can reduce the chance that small maintenance problems become major leaks.
[IMAGE PLACEHOLDER 2]
Placement: Immediately after the “What to Check After a Storm” warning-signs table
Purpose: Help homeowners recognize common visible storm damage without encouraging unsafe roof access.
Caption: Missing shingles, damaged flashing, and displaced roofing materials are common signs that a professional inspection may be needed.
Alt Text: Roof storm damage warning signs including loose shingles and flashing
Image Prompt: Realistic close-range residential roofing photograph showing storm damage visible from a safe elevated viewpoint, including several lifted asphalt shingles, slightly bent flashing near a vent, scattered small tree debris and a damaged gutter edge, no worker or homeowner standing on the roof, overcast post-storm lighting, highly realistic construction details, educational editorial style, no text or logos.
Recommended Size: 900×600 px
Suggested File Name: roof-storm-damage-warning-signs.jpg
Suggested Surrounding Text: Visible damage is only part of the picture, so questionable conditions should be assessed by a qualified roofing professional.