How to Fix a Metal Roof Leak: A Practical Homeowner’s Guide

A leaking metal roof can quickly turn a small maintenance problem into damaged insulation, stained ceilings, mold growth, or electrical hazards. The difficult part is that water does not always drip directly below the damaged area. It may travel along a panel, fastener, roof deck, or rafter before entering your home.
Learning how to fix a metal roof leak starts with finding the true entry point. Most leaks develop around screws, seams, flashing, vents, skylights, or damaged sealant—not through the middle of an undamaged metal panel.
This guide explains how to locate common leak sources, choose the correct repair method, avoid unsafe DIY work, and decide when professional help is the smarter investment.
Quick Answer
To fix a metal roof leak, identify the exact entry point, remove dirt and failed sealant, allow the surface to dry, and repair the damaged fastener, seam, flashing, or panel with compatible roofing materials. Avoid repairing wet, steep, badly rusted, or structurally damaged roofs yourself.
First, Confirm That the Roof Is Actually Leaking
A ceiling stain does not always mean rain is entering through the roof. Condensation, plumbing problems, HVAC equipment, and poorly insulated ducts can create similar signs.
Check the affected area during or shortly after rain. If possible, inspect the attic from a safe walkway with a flashlight.
Look for:
- Wet roof decking
- Water trails on rafters
- Damp insulation
- Rust marks around fasteners
- Dark staining below a roof penetration
- Daylight entering through a hole
- Moisture around vent pipes or chimneys
Mark the general location from inside. Then compare it with the roof layout outside.
Remember that water can travel several feet before dripping. The visible ceiling stain may be downhill from the actual roof opening.
Common Causes of Metal Roof Leaks
Understanding the cause helps you choose a lasting repair instead of covering the area with more caulk.
Loose or Damaged Fasteners
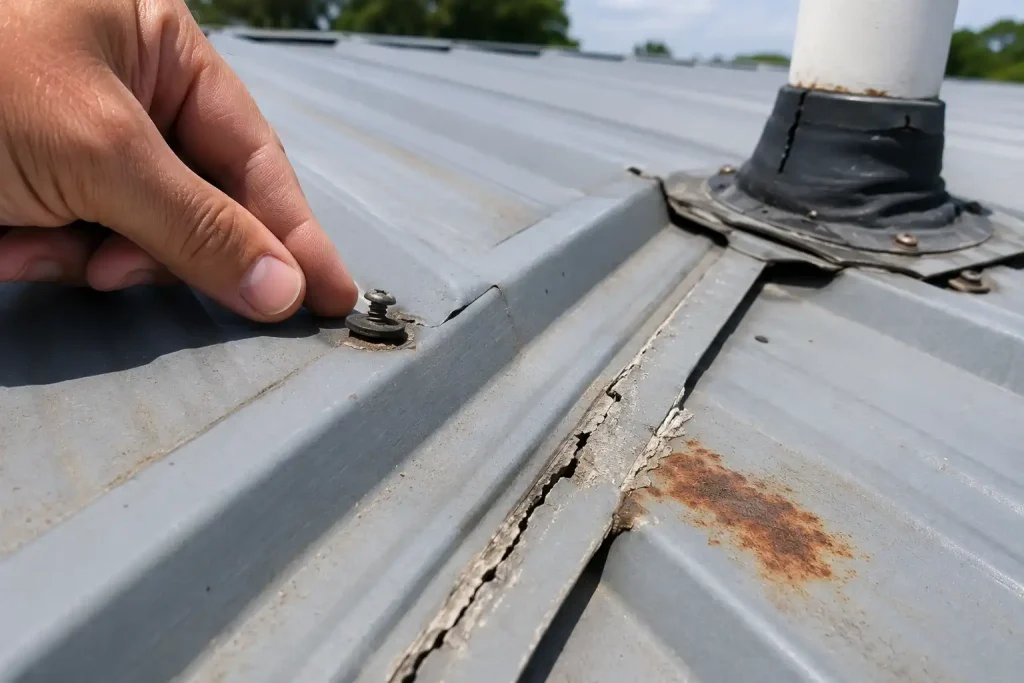
Exposed-fastener metal roofs use screws with rubber or synthetic washers. These washers seal the holes where the screws pass through the panels.
Leaks may develop when:
- Screws loosen because of roof movement
- Washers crack or shrink
- Screws were driven at an angle
- Fasteners were over-tightened
- Fasteners were not driven tightly enough
- The hole beneath a screw becomes enlarged
- The wrong fastener was used
A loose screw may appear slightly raised. A damaged washer may look cracked, flattened, split, or pushed out from under the screw head.
Failed Seams and Panel Laps
Metal roof panels overlap or connect along seams. Water can enter when the seam opens, the original sealant fails, or the roof moves because of temperature changes.
Horizontal end laps are particularly vulnerable because water flows across them. Standing seams can also leak when clips, locks, or concealed sealants fail.
Damaged Flashing
Flashing directs water away from roof edges, valleys, walls, chimneys, skylights, and other transitions.
A flashing leak may be caused by:
- Loose flashing
- Missing fasteners
- Cracked sealant
- Improper overlap
- Wind damage
- Corrosion
- Poor original installation
FEMA recommends seeking professional help when roof flashing shows staining or damage because the visible problem may indicate a larger failure around the roof opening. (FEMA)
Leaks Around Roof Penetrations
Vent pipes, exhaust vents, skylights, chimneys, antennas, and solar mounting points interrupt the roof surface. Each opening requires a properly designed flashing system.
Rubber pipe boots can crack after years of sun exposure. Metal flashing can separate as the roof expands and contracts. Sealant alone is rarely a permanent substitute for correct flashing.
Rust or Corrosion
Minor surface rust does not always create an immediate leak. However, advanced corrosion can thin the metal until small holes form.
Rust is more likely around:
- Scratched coatings
- Cut panel edges
- Standing water
- Incompatible metals
- Old fasteners
- Coastal environments
- Areas covered with wet debris
Extensive rust usually requires more than a bead of sealant. The damaged panel or section may need to be replaced.
Storm or Impact Damage
Hail, fallen branches, wind-driven debris, and severe storms can dent panels, loosen flashing, damage seams, or pull fasteners from the roof deck.
A dent is not automatically a leak. However, dents near seams, fasteners, valleys, or penetrations deserve closer inspection.
Condensation Beneath the Roof
Warm, humid indoor air can condense against a cold metal surface. This moisture may drip into the attic and look like a roof leak.
Possible condensation problems include:
- Poor attic ventilation
- Missing vapor control materials
- Inadequate insulation
- Exhaust fans venting into the attic
- High indoor humidity
- Uninsulated metal surfaces
Sealant will not solve condensation. The moisture source, ventilation, and insulation must be corrected.
Safety Before Repairing a Metal Roof
Never work on a metal roof while it is wet, icy, windy, or covered with loose debris. Metal surfaces can become extremely slippery.
Roofing work also creates a serious fall risk. OSHA’s residential fall-protection guidance explains the protective systems used to reduce falls during residential construction and roofing work. Professional roofers working six feet or more above a lower level generally require appropriate fall protection. (OSHA)
Do not climb onto the roof when:
- The roof is steep
- The surface is wet or unstable
- The leak is near a roof edge
- Power lines are nearby
- The decking may be rotten
- You do not have proper access and fall protection
- You feel uncertain about your balance or equipment
A homeowner can often inspect the attic, photograph the roof from the ground, and describe the leak to a contractor without stepping onto the roof.
Do not enter an attic where water is touching wiring, light fixtures, or electrical equipment. Turn off power to the affected area when it can be done safely and contact the appropriate professionals.
Tools and Materials for a Minor Repair
The exact materials depend on the roof system and leak source. A minor exposed-fastener repair may require:
- Manufacturer-approved replacement fasteners
- New sealing washers
- Cordless drill or screw gun
- Compatible metal-roof sealant
- Butyl sealing tape
- Wire brush or non-abrasive cleaning tool
- Clean rags
- Mild roof-safe cleaner
- Matching sheet-metal patch
- Metal snips
- Rust-inhibiting primer
- Manufacturer-approved touch-up coating
- Gloves and eye protection
The Metal Construction Association’s Metal Roof Installation Manual covers important metal-roofing subjects such as fasteners, sealants, maintenance, safety, and reroofing. Product-specific manufacturer instructions should still take priority for your roof system. (Metal Construction Association)
Do not assume that every roofing sealant works on metal. The product must be compatible with the panel coating, roof material, temperature movement, and existing sealant.
How to Fix a Metal Roof Leak Step by Step
These steps are appropriate only for a small, accessible repair on a dry, stable, low-slope roof when proper safety protection is available.
1. Limit Interior Water Damage
Place a bucket beneath active dripping. Move furniture and electronics away from the area.
If the ceiling is bulging with water, keep people away from it. A water-filled ceiling can collapse without warning. Contact a roofer, restoration company, or emergency service provider when the damage is extensive.
Remove wet insulation only when the area is electrically safe and accessible. Begin drying the space quickly with ventilation, fans, or dehumidification.
The EPA advises homeowners to correct water problems promptly and dry wet materials completely because moisture supports mold growth. Its home mold and moisture guidance also explains that some wet porous materials may need to be discarded if they cannot be cleaned and dried. (US EPA)
2. Trace the Leak From Inside
Use a flashlight to follow water marks upward.
Check the roof deck and framing above the stain. Look for the highest wet point rather than stopping at the first drip.
Measure the location from fixed features such as:
- Exterior walls
- Chimneys
- Vent pipes
- Roof ridges
- Skylights
- Attic access points
This information will help locate the corresponding area outside.
3. Inspect the Exterior Area
Inspect an area larger than the interior stain. Water may have entered higher on the roof.
Look closely at:
- Fastener heads and washers
- Panel seams
- End laps
- Flashing edges
- Pipe boots
- Skylight corners
- Valleys
- Sealant joints
- Rusted areas
- Punctures or impact marks
Do not rely only on visible holes. A slightly open seam or failed washer can admit a surprising amount of water during wind-driven rain.
4. Clean and Dry the Repair Surface
Sealant will not bond properly to dirt, moisture, loose paint, rust flakes, or old failing material.
Remove loose sealant carefully without scratching the protective panel coating. Clean the area with a roof-safe product and allow it to dry fully.
Follow the sealant manufacturer’s temperature and surface-preparation requirements.
5. Repair Loose or Failed Fasteners
Remove the damaged fastener rather than simply tightening it repeatedly.
Inspect the hole and the supporting material beneath it. Replace the fastener with a manufacturer-approved repair fastener and a new sealing washer.
Drive the fastener straight and tighten it only until the washer is evenly compressed.
Do not crush or split the washer. Over-tightening can damage the seal, deform the panel, and create another leak.
If the hole is badly enlarged or the deck below is damaged, a larger repair may be required. Do not keep installing increasingly larger screws without checking the substrate.
6. Repair a Leaking Seam
Remove failed surface sealant and clean the seam.
Depending on the roof design, the repair may require:
- Carefully opening the lap
- Removing failed sealant or tape
- Installing compatible butyl tape
- Closing and fastening the seam correctly
- Applying an approved exterior sealant where specified
Do not use ordinary household caulk. Metal panels move as temperatures change, so the repair material must remain flexible.
Standing-seam roof repairs are generally better handled by a metal-roofing contractor. Improperly opening, drilling, or sealing a standing seam can interfere with its movement and drainage design.
7. Repair Flashing or a Pipe Boot
Small gaps around sound flashing may sometimes be resealed after the failed material is removed and the surface is cleaned.
Replace a pipe boot when it is cracked, split, badly distorted, or pulling away from the panel. The replacement must fit the pipe and roof profile and be installed with compatible sealant and fasteners.
Do not cover damaged flashing with a thick layer of roof cement. Flashing must shed water mechanically, not depend entirely on exposed sealant.
8. Patch a Small Hole
A tiny puncture in an otherwise sound exposed-fastener panel may be repaired with a properly designed metal patch.
A durable patch normally involves:
- Removing rust and loose coating
- Treating exposed metal as required
- Cutting a rounded patch from compatible metal
- Placing butyl tape beneath the patch
- Fastening it according to the roof manufacturer’s guidance
- Sealing the required edges and fastener heads
The patch should extend beyond the damaged area and allow water to flow over it.
Do not combine metals that can react with each other. An incompatible patch or fastener can accelerate corrosion.
Large holes, cracked panels, failed standing seams, and widespread rust usually require panel replacement.
9. Test the Repair
After the materials have cured, inspect the area during the next rainfall.
A controlled water test can also be performed from the lowest part of the suspected area and moved upward gradually. One person should apply water while another observes the attic.
Do not spray water upward beneath panel laps or flashing. That can create an artificial leak that normal rain would not cause.
10. Inspect the Interior Again
Confirm that the decking, insulation, framing, and ceiling are drying.
A successful exterior repair is only part of the job. Wet insulation may lose performance, and damaged drywall may need replacement.
Choosing the Right Repair for the Leak

| Leak condition | Possible repair | DIY suitability | Long-term concern |
|---|---|---|---|
| One loose screw with sound decking | Replace with an approved repair fastener and washer | Possible in safe conditions | Check nearby fasteners for similar wear |
| Small failed sealant joint | Remove failed material and apply compatible sealant | Possible for accessible minor joints | Sealant may fail again if the flashing moves |
| Open panel lap | Reinstall compatible butyl tape and refasten correctly | Usually professional | Incorrect repair may trap water |
| Cracked pipe boot | Replace the complete boot | Often professional | Boot must fit the roof profile and pipe |
| Small isolated puncture | Install a compatible metal patch | Experienced DIY or professional | Poor patches can trap moisture |
| Widespread rust or pinholes | Replace affected panels | Professional | Corrosion may extend beyond visible damage |
| Leaking standing seam | Diagnose clips, seams, and movement | Professional | Surface caulk may hide the real failure |
| Multiple recurring leaks | Full roof inspection and repair plan | Professional | Roof system or installation may be failing |
Repair Quality, Durability, and Cost Factors
The least expensive repair is not always the best value. A small bead of sealant may stop dripping temporarily, but it will not correct loose flashing, failed panel movement, deteriorated decking, or severe corrosion.
Repair cost and durability depend on:
- Roof height and slope
- Access difficulty
- Type of metal roof
- Location of the leak
- Number of failed areas
- Panel availability
- Decking condition
- Rust severity
- Need for interior repairs
- Local labor rates
- Safety equipment requirements
A single failed exposed fastener may be a limited repair. A leak involving concealed seams, structural decking, a skylight, or several rusted panels will be more involved.
Ask contractors whether the estimate addresses the cause of the leak or only seals the visible symptom.
Expert Tip
Expert Tip: Photograph the leak area inside the attic during or immediately after rain. Water trails often disappear after the roof dries, and those photos can help a contractor locate the true entry point faster.
Repair or Replace the Metal Roof?
Repair is usually reasonable when:
- The roof is generally in good condition
- Damage is limited to one area
- Most panels remain solid
- Corrosion is minor and isolated
- The problem is caused by a replaceable fastener, boot, or flashing detail
- Previous repairs have not repeatedly failed
Replacement or a larger restoration may be more practical when:
- Leaks appear in several unrelated locations
- Many fasteners and washers are failing
- Panels have widespread corrosion
- The roof deck is soft or rotten
- Seams repeatedly reopen
- Multiple layers of old sealant cover the roof
- Panels were installed incorrectly
- Repair costs are becoming repetitive
- The roof has major storm or structural damage
A roof coating may help some aging metal roofs, but it is not a cure for loose panels, wet insulation, failed decking, or structural movement. Repairs and preparation must be completed before coating.
When to Call a Roofing Professional
Call a qualified metal-roofing contractor when:
- The roof is steep, high, wet, or difficult to access
- The leak is near an electrical system
- You cannot locate the source
- The roof is standing seam
- Flashing must be rebuilt
- A skylight or chimney is leaking
- Rust has created several holes
- The roof deck feels soft
- Panels are lifting or moving
- Storm damage may support an insurance claim
- A previous DIY repair failed
- Water continues entering after the suspected area was sealed
Look for a contractor with specific metal-roof experience. Metal panels, seams, clips, fasteners, and coatings behave differently from asphalt shingles.
Before hiring, ask for:
- Proof of licensing where required
- Current insurance information
- Experience with your roof profile
- A written repair scope
- Material and sealant names
- Warranty terms
- Before-and-after photographs
- An explanation of why the leak occurred
Be cautious when someone proposes coating the entire roof without first checking seams, flashing, fasteners, drainage, rust, and wet insulation.
Common Mistakes Homeowners Should Avoid
- Applying sealant over dirt or moisture: The material may peel away before it forms a reliable bond.
- Using ordinary household caulk: It may not tolerate ultraviolet exposure, metal movement, or roofing temperatures.
- Covering everything with roofing tar: Tar can crack, trap moisture, stain panels, and make future repairs difficult.
- Over-tightening screws: This crushes the washer and may deform the panel.
- Tightening every loose screw without inspection: A stripped hole may require an approved repair fastener or deck repair.
- Sealing the bottom edge of flashing: Some flashing details need an open drainage path.
- Ignoring condensation: A ventilation or insulation problem will continue even after exterior sealing.
- Walking on a wet metal roof: The fall risk is far greater than the value of a minor DIY repair.
- Patching over severe rust: Thin, corroded metal may fail around the patch.
- Mixing incompatible metals: The reaction between certain metals can accelerate corrosion.
- Repairing only the ceiling: Interior paint does not stop the water entering from above.
- Assuming the stain is directly below the leak: Water often travels along the structure before dripping.
FAQs
Can I use silicone to fix a metal roof leak?
Only use a silicone product specifically approved for your metal roofing material and panel coating. General-purpose silicone may not bond correctly and can complicate future repairs. Follow the panel and sealant manufacturers’ compatibility requirements.
Can I tighten leaking metal roof screws?
A slightly loose screw may sometimes be corrected, but tightening an old screw does not repair a cracked washer or stripped hole. Remove and inspect the fastener. Replace damaged components with an approved roofing fastener and sealing washer.
Why does my metal roof leak only during heavy rain?
Wind-driven rain can push water into small openings around seams, flashing, fasteners, and penetrations. Heavy rain can also overwhelm poorly designed valleys or drainage areas. Leaks that appear only during certain wind directions often point to a flashing or seam problem.
Is roofing tar suitable for a metal roof?
Roofing tar is generally a poor long-term repair for metal panels. It can crack as the roof moves, collect debris, trap water, and interfere with later repairs. Use a compatible metal-roof sealant, but only after correcting the underlying defect.
How long should a metal roof leak repair last?
Durability depends on the cause and repair method. A correctly replaced fastener, boot, flashing component, or panel can provide a long-term solution. Surface sealant applied over movement, rust, or damaged materials may fail much sooner.
Can a leaking metal roof be coated instead of replaced?
Some metal roofs can be coated after all leaks, rust, seams, fasteners, and drainage problems are repaired. Coating should not be applied over wet insulation, unstable panels, severe corrosion, or damaged decking.
How do I find a leak when the roof looks fine?
Inspect the attic during rain and trace water marks to their highest point. Check exterior features uphill from that location, including fasteners, seams, flashing, vents, valleys, and panel ends. A professional moisture inspection or controlled water test may be needed when the source remains hidden.
Conclusion
Knowing how to fix a metal roof leak begins with accurate diagnosis. Loose fasteners, failed seams, damaged flashing, worn pipe boots, corrosion, and condensation require different solutions. Simply covering the area with caulk may hide the problem without creating a durable repair.
Control interior water first, inspect the roof and attic carefully, and use only compatible metal-roofing materials. Most importantly, do not trade personal safety for a small repair.
For a minor, accessible defect, a properly installed replacement fastener, seal, boot, or metal patch may solve the problem. For recurring leaks, standing-seam failures, extensive rust, storm damage, or unsafe roof conditions, schedule an inspection with an experienced metal-roofing contractor and request a written repair plan.